


Peureki
-
Posts
427 -
Joined
-
Days Won
3
Content Type
Profiles
Forums
Gallery
Events
Posts posted by Peureki
-
-

LS4 In-Depth Map Event Information and Guide
Updated: 3/17/19
Description:
- This page is dedicated to notable events of what each map has to offer. There are A LOT more little details about the map, but you could find those guides from other sources such as the Wiki or Dulfy. This includes things such as unique skins, mastery points, or map completion.
Currency: Volatile Magic (VM)
Gold Per Hour:
- All maps are very profitable in their own way
- In the Excel Spreadsheet below, these are how much potential gold I could make in most maps
1. Domain of Istan (WIP)
Spoiler
Domain of Istan
Pros:
- High gold per hour
- Fast-pace
- Easy with a large group
- Meta farming spot
Cons:
- Need a large group
Unique Items:
- Astral and Stellar Weapons (achievements)
- Brandstones
To Earn Good Profit:
-
Do both metas
- Palawadan
- Great Hall
- Do Rewarding Events
- Gather all caches
-
Consume excess Kralkatite Ore for VM
- Use VM to buy Trophy Shipments from VM vendor
Meta Events
1. Palawadan
Spoiler2. Sunspear Uprising (Great Hall)
SpoilerRewarding Events
SpoilerAkili
Spoilerstuff
Corsair Event Chain
Spoilerstuff
Stop the Book-burning Raid on the Astralarium Library
Spoilerstuff
Brandstone Meteors
SpoilerSunspear Caches
Spoilerstuff
Bounties
Spoilerstuff
2. Sandswept Isles
Spoiler
Sandswept Isles
Pros:
- High amount of VM
- High amount of regular champ bags
- Constant events, meta
- Mostly easy bounties
Cons:
-
Events not easily solo-able
- Always need a group or pugs
- May be difficult to navigate
Unique items:
-
Ascended trinkets (CORE + POF stats)
- Ring
- Accessory
- Backpiece: Mark Y Golem (achievements)
- Difluorite Crystals
- 32 slot bag (achievements)
-
Prototype Position Rewinder (obtained by Heart at Anniogel Encampment Waypoint — [&BCULAAA=] )
- Ability to rewind your position to a previously marked location
To earn good profit:
-
Tag all mobs and champions to obtain most amount of VM
-
Consume excess Difluorite for extra VM
- Exchange VM -> Trophy Shipments via VM Vendor
-
Consume excess Difluorite for extra VM
-
Do both Metas in this order (if both are up)
- Specimen Chamber
- Gathering Storms
- Do Rewarding Events in between Meta cooldowns
- Do Bounties in between everything else
META Events
1. The Specimen Chamber
SpoilerThe Specimen Chamber
Information:
- Takes about 15-30 minutes total (unless with a bad/low group)
- Guaranteed boss chest + 5 Difluorite Crystals (once per character)
- Guaranteed extra 2-3 Difluorite Crystals via event chests during Phase Two of meta (no limit)
-
No global timer. Tied to unique instance
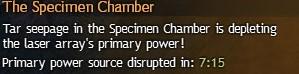
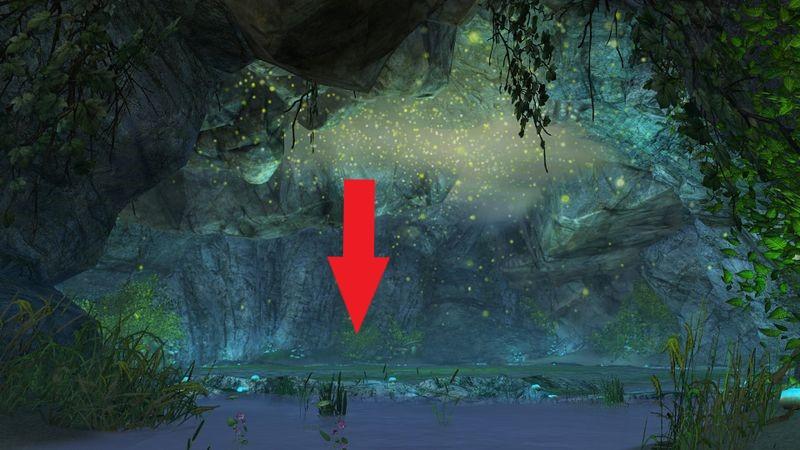
- Cooldown is 45 minutes after most recent completion. After 30 minutes, this window will pop up on the bottom half of the map (starting with a 15 minute timer):
How to get there:
- Go to Anniogel Encampment Waypoint — [&BCULAAA=]
- Head southwest to a purple portal indicated on your mini map
This meta has two phases:
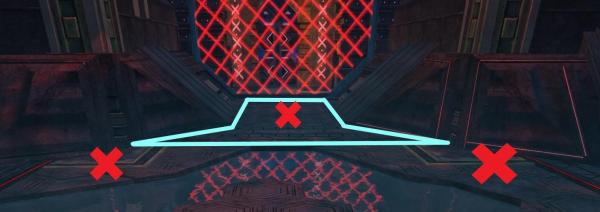
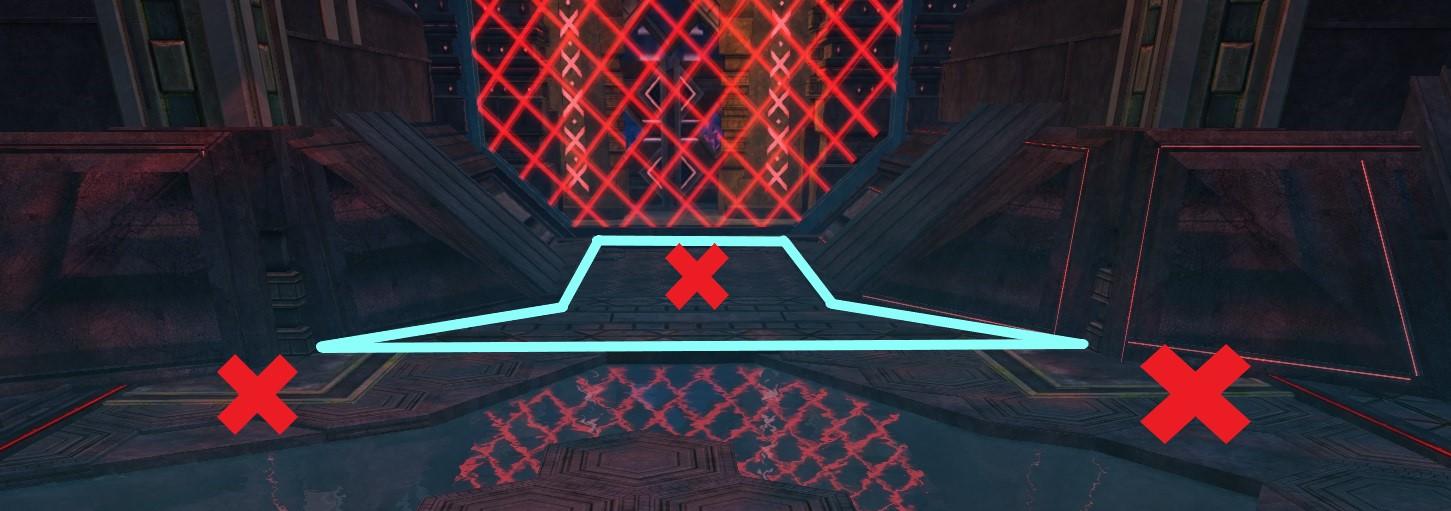
Phase One
- Defend for 6 minutes
Notes:
- There will always be some champions spawning, regardless of scale
- All mobs drop VM and loot
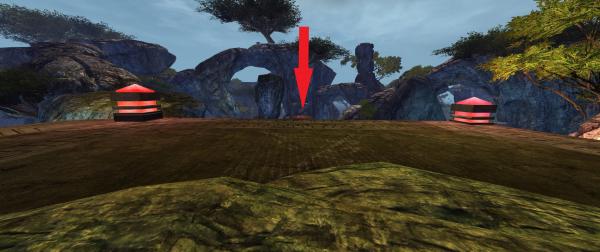
Blue area = Area to defend
Red X = Area where mobs spawn
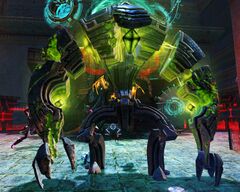
Phase two
- Defeat two unique bosses separately
- Defeat the two unique bosses simultaneously
Notes:
-
There are 6 different bosses that could spawn with their own mechanic
-
Jormag Minion (Ice) = Uses shield to retaliate damage back to players, melee attacks, ice DoT fields, summons totem at 50% health to push all players to the edge of the arena with ice DoT fields
- Counter: Use range, use heals/blocks (if melee often), and stay away from the edges at all cost
-
Subject Beta (Purple) = Laser beam in front, pulsing anti-gravity aoes, focuses on a single player while stunning them and producing an enemy field
- Counter: Stand behind, glide if pushed above ground to not take fall damage
-
Mordrem (Green) = Leaps onto players, knocking players back, melee attacks, and summons plants that throw poison projectiles
- Counter: Range, dodge/block constantly if melee-ing
-
Destroyer (Red) = Throws fire projectiles from and towards itself, smashes ground in front while creating a fire wave, leaps towards players with deadly burst
- Counter: Stand behind, jump/dodge fire waves
-
Undead Frog (Grey) = Drops poison aoes on top of boss, consumes players in front, throws poison projectiles in front, leaps often
- Counter: Stand behind, range, avoid getting consumed
-
Branded (Also Purple) = Dashes in a line while stunning any player it touches, melee attacks, summons branded pulsing aoes
- Counter: = Stand behind, range
-
Jormag Minion (Ice) = Uses shield to retaliate damage back to players, melee attacks, ice DoT fields, summons totem at 50% health to push all players to the edge of the arena with ice DoT fields
- When fighting two bosses simultaneously, they share the same health bar. Pick which boss you think is easier to handle

2. Gathering Storms
SpoilerGathering Storms
Information:
-
Takes about 15-30 minutes to complete
- Loot phase upon completion
- Guaranteed boss chest + 5 Difluorite Crystals (once per character)
-
No global timer, unique to instance
- Respawns 30 minutes after most recent completion
- This dialog means it will be starting in a few minutes:

How to get there:
- Go to Atholma Waypoint — [&BEMLAAA=]
- Find event on the mini map
This meta has five phases:
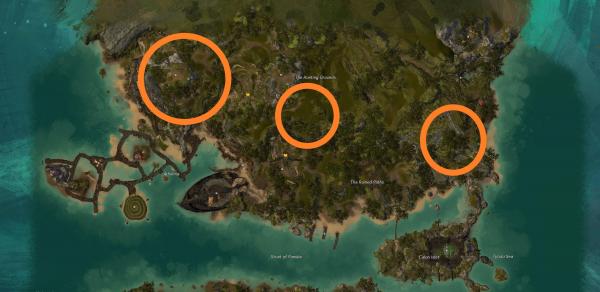
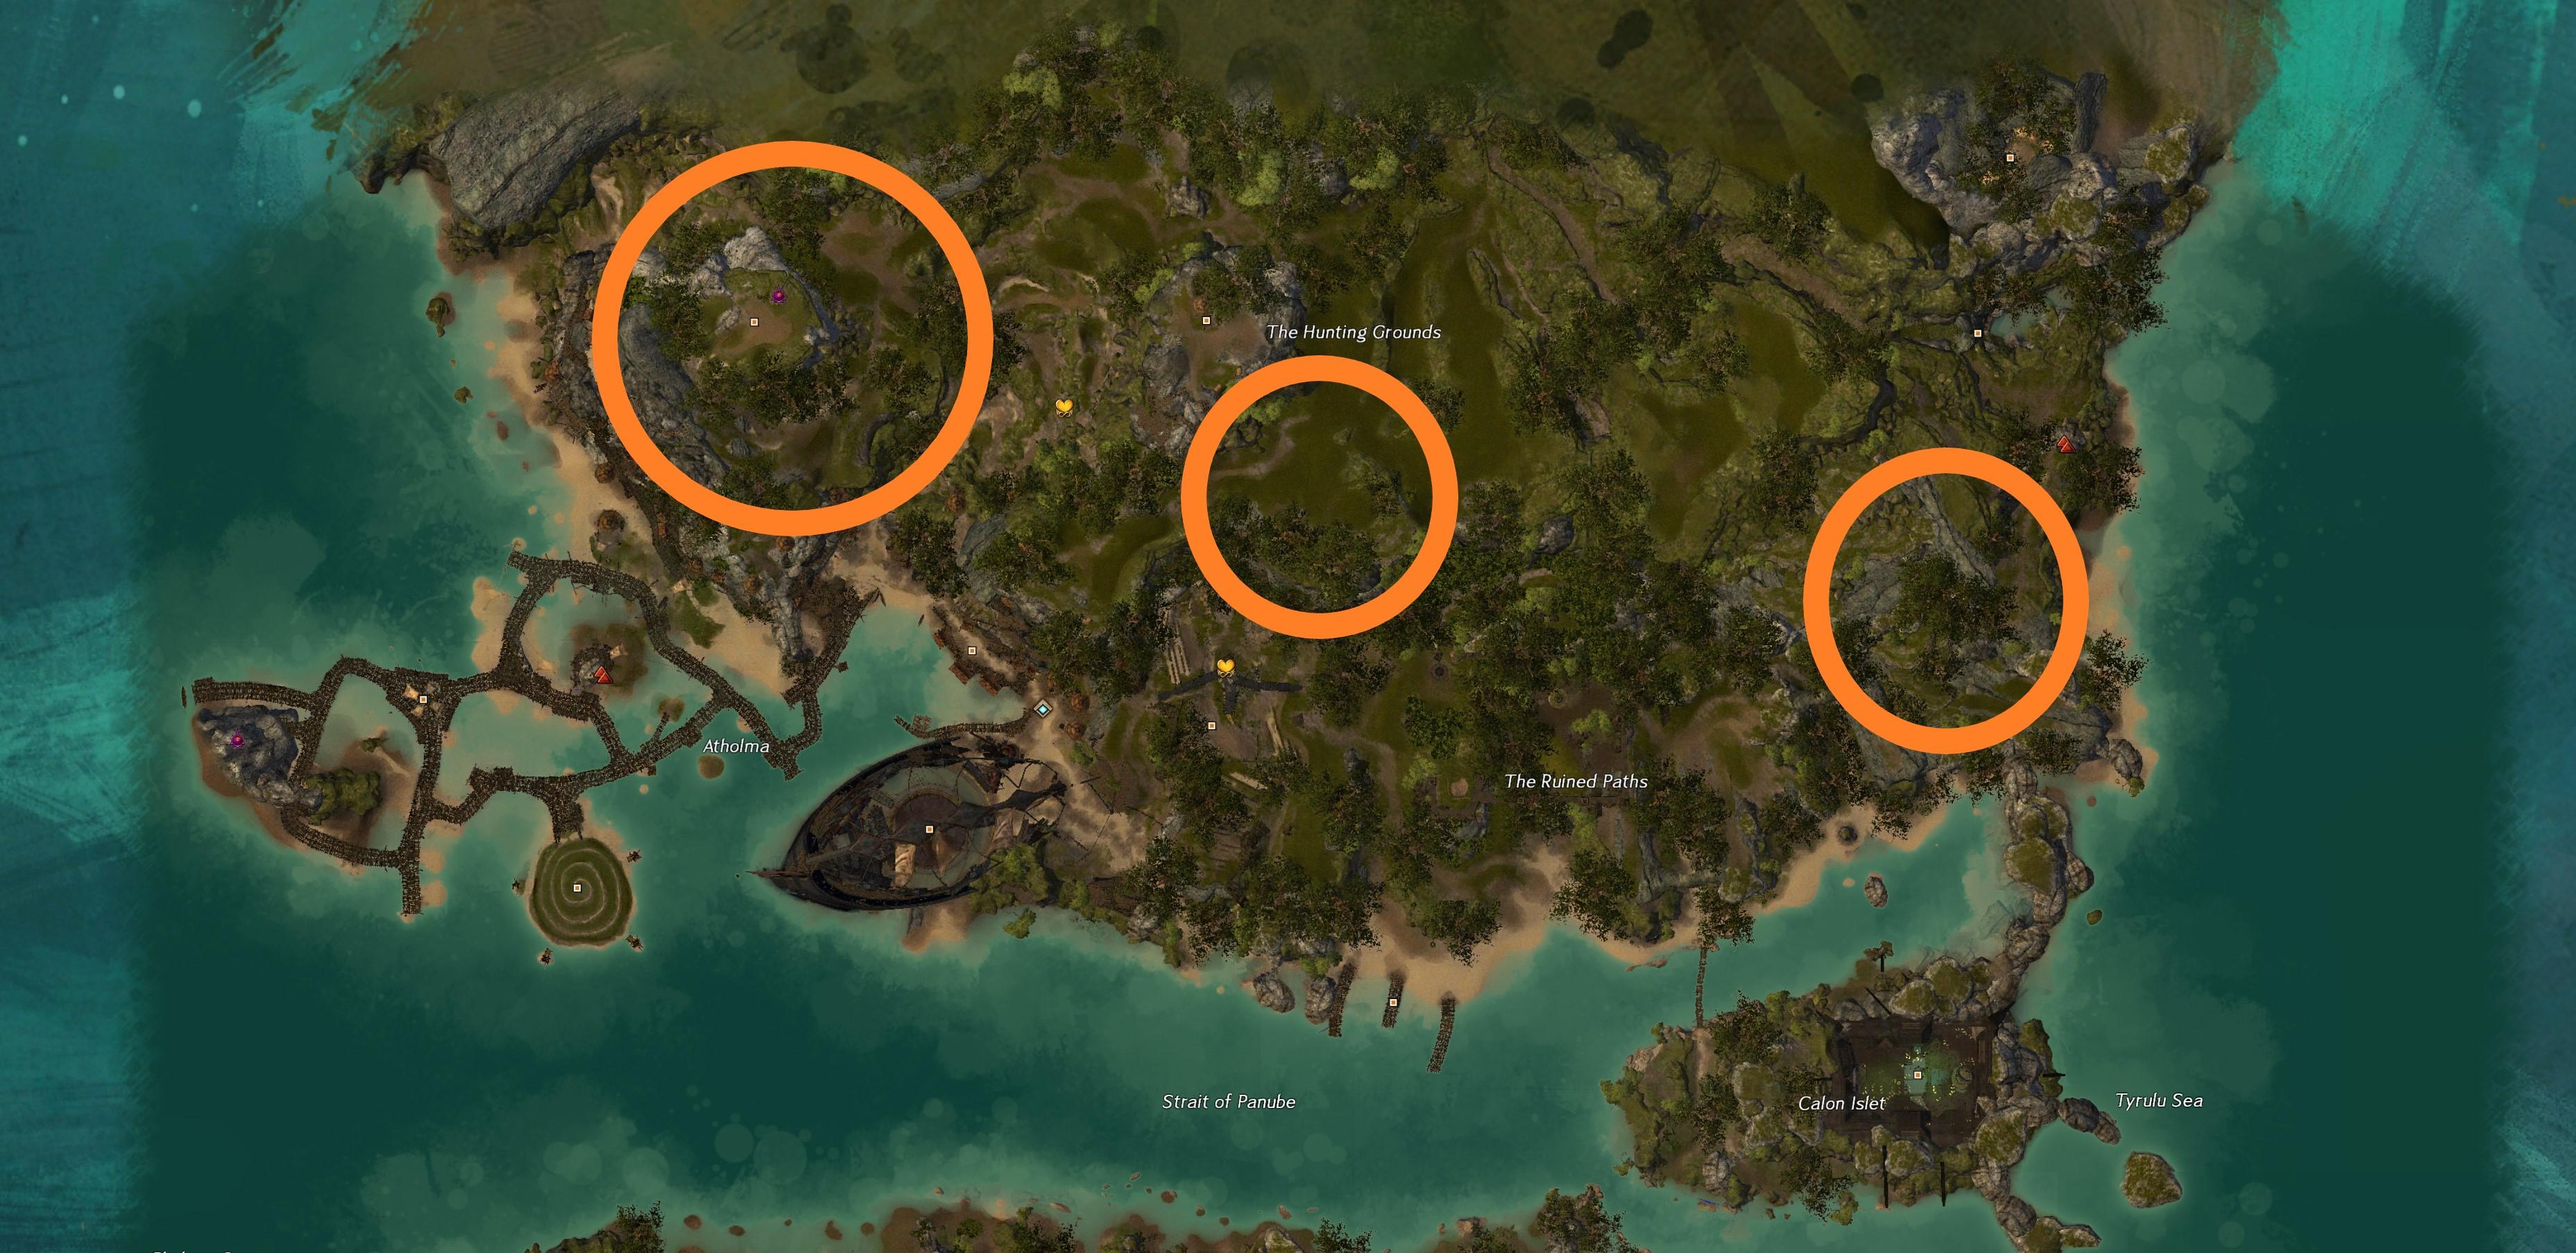
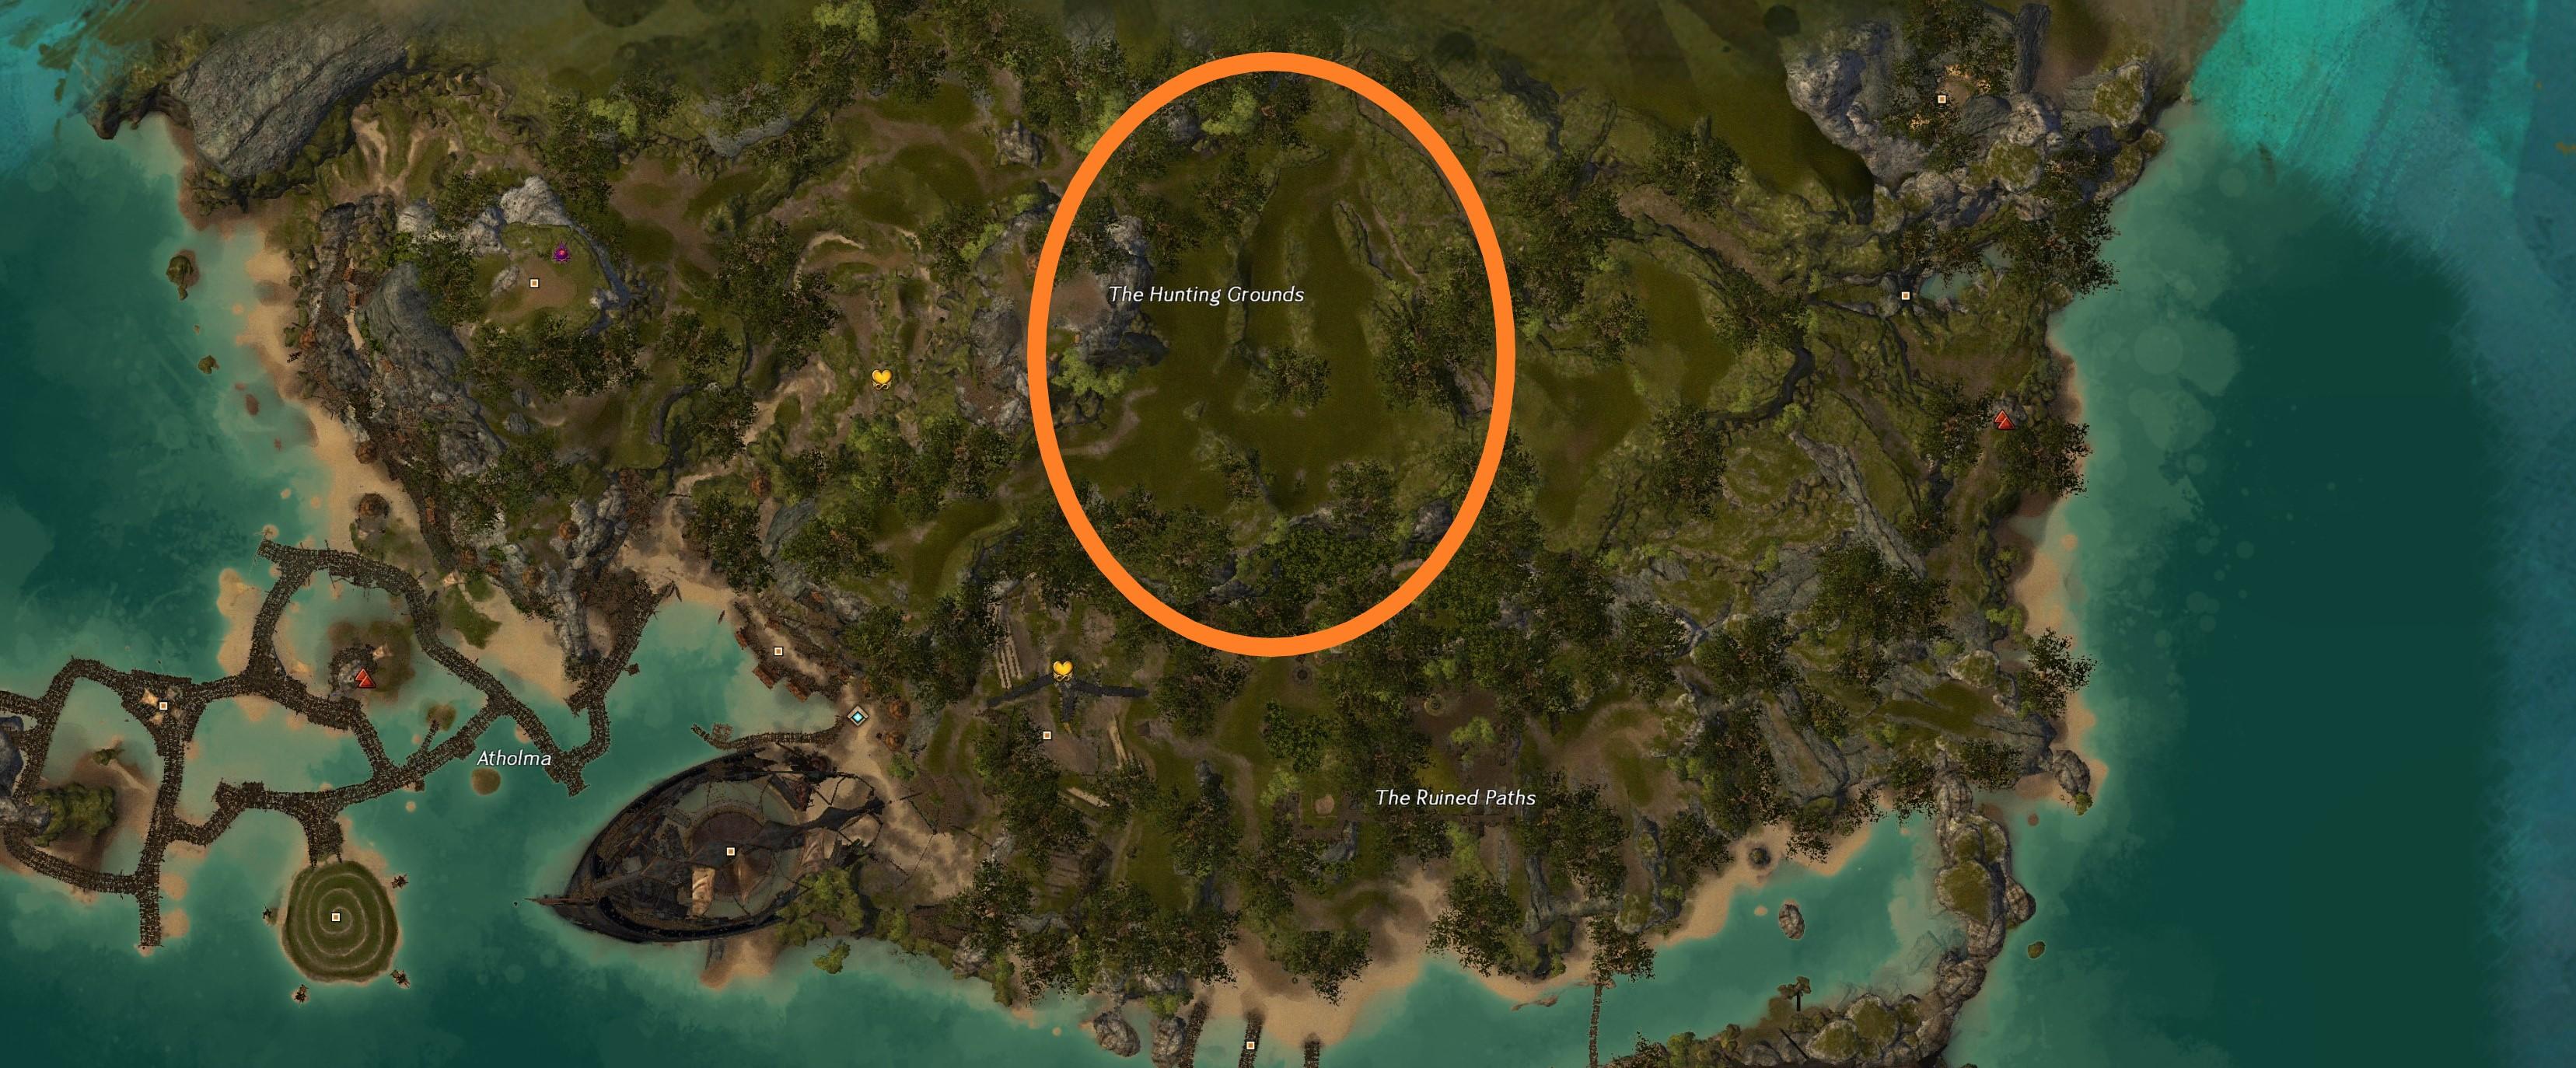
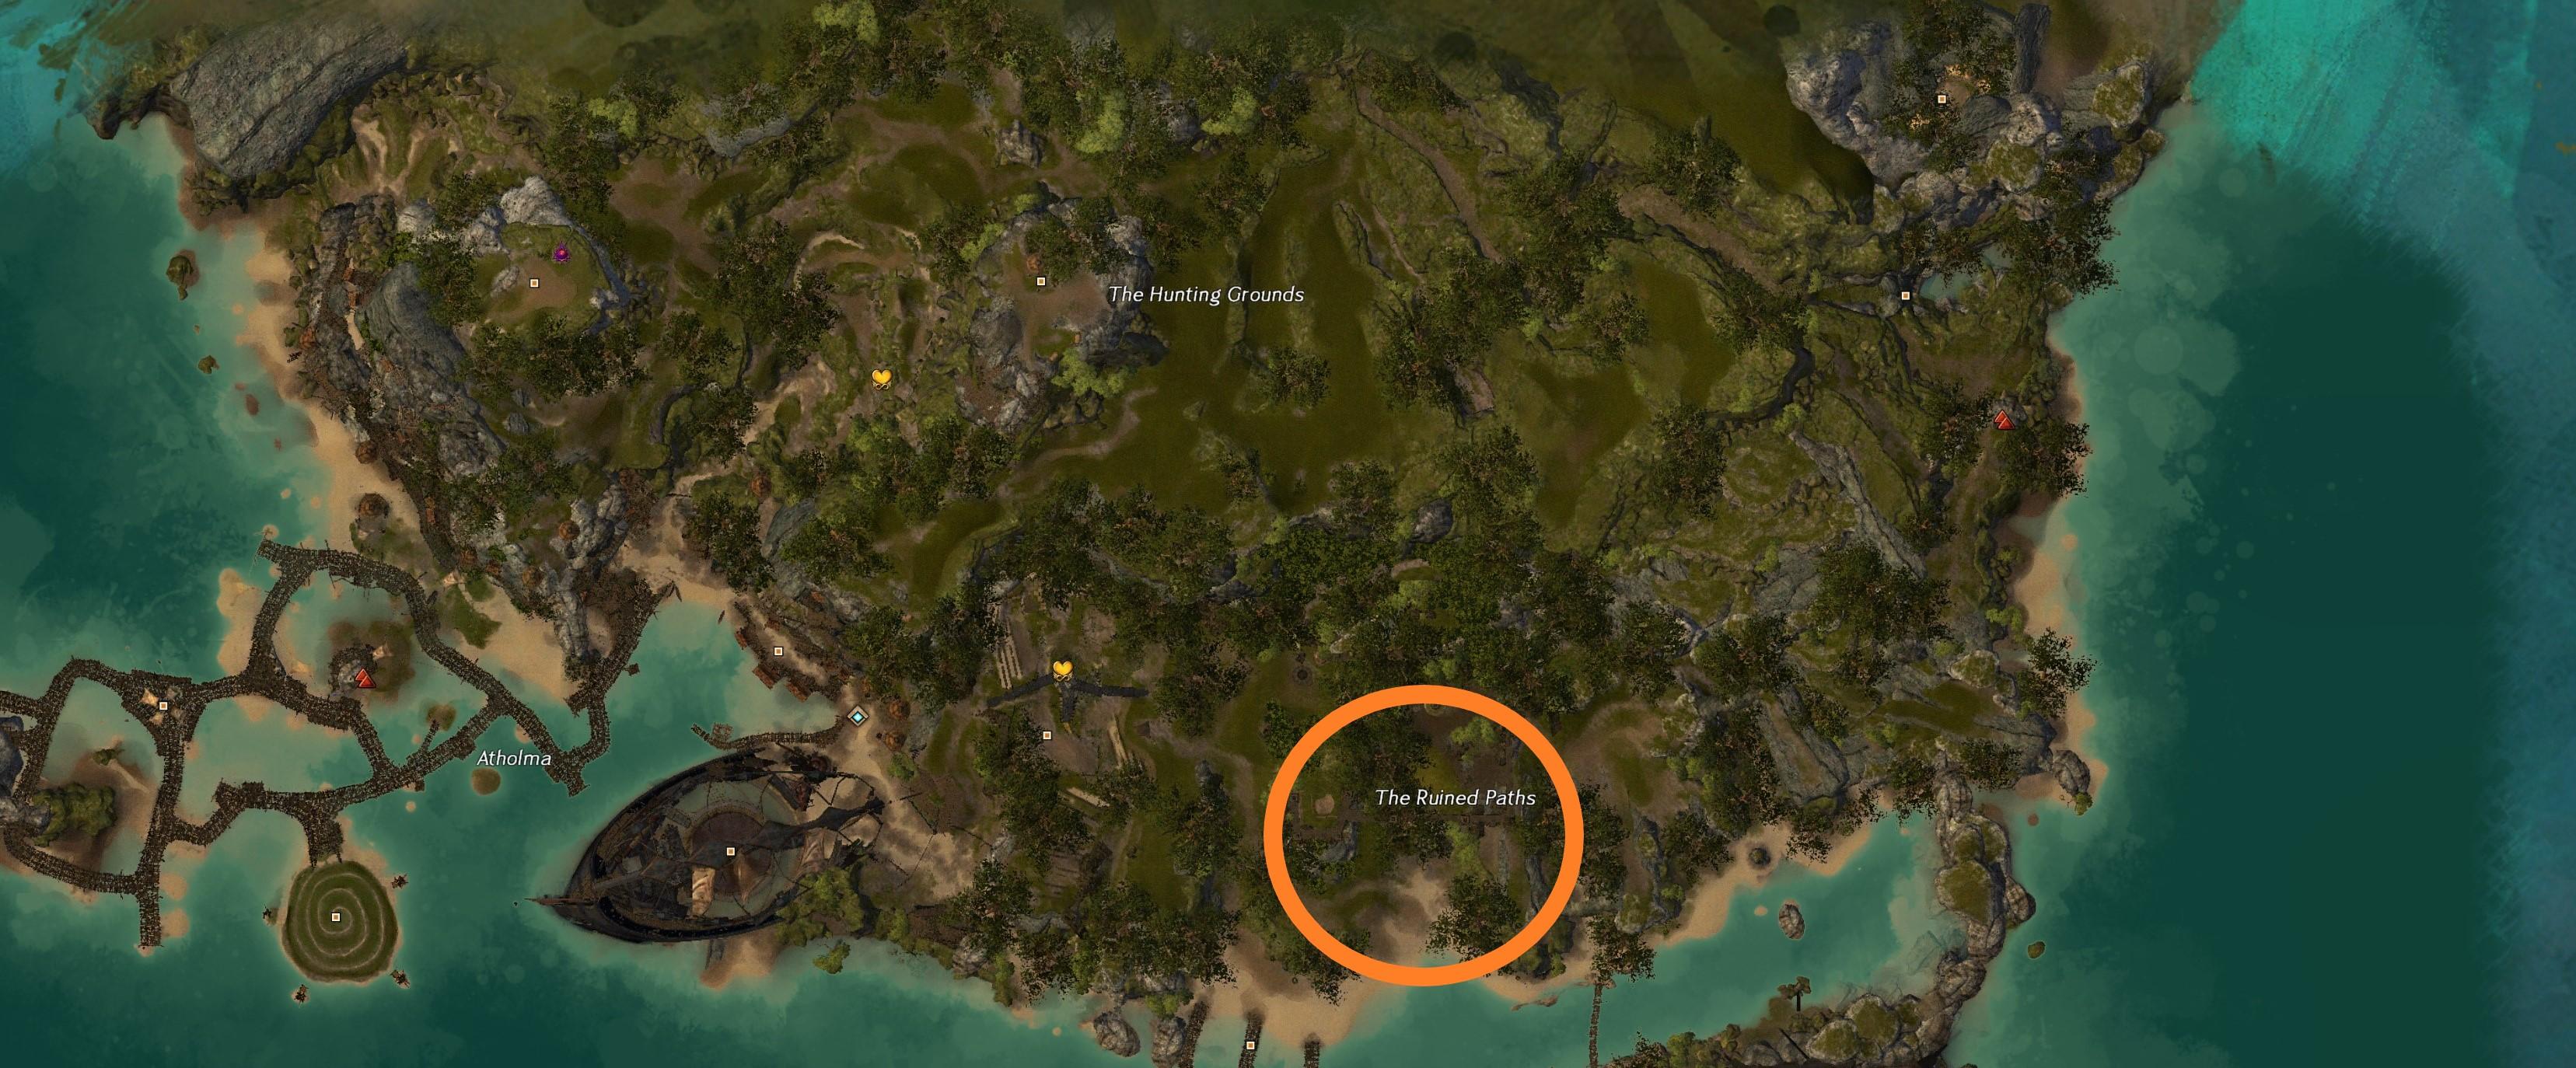
Phase One
- Hunt down wandering elementals throughout the isles
Notes:
- Easily solo-able
-
Four seperate events will spawn
- Orange circle = General locations

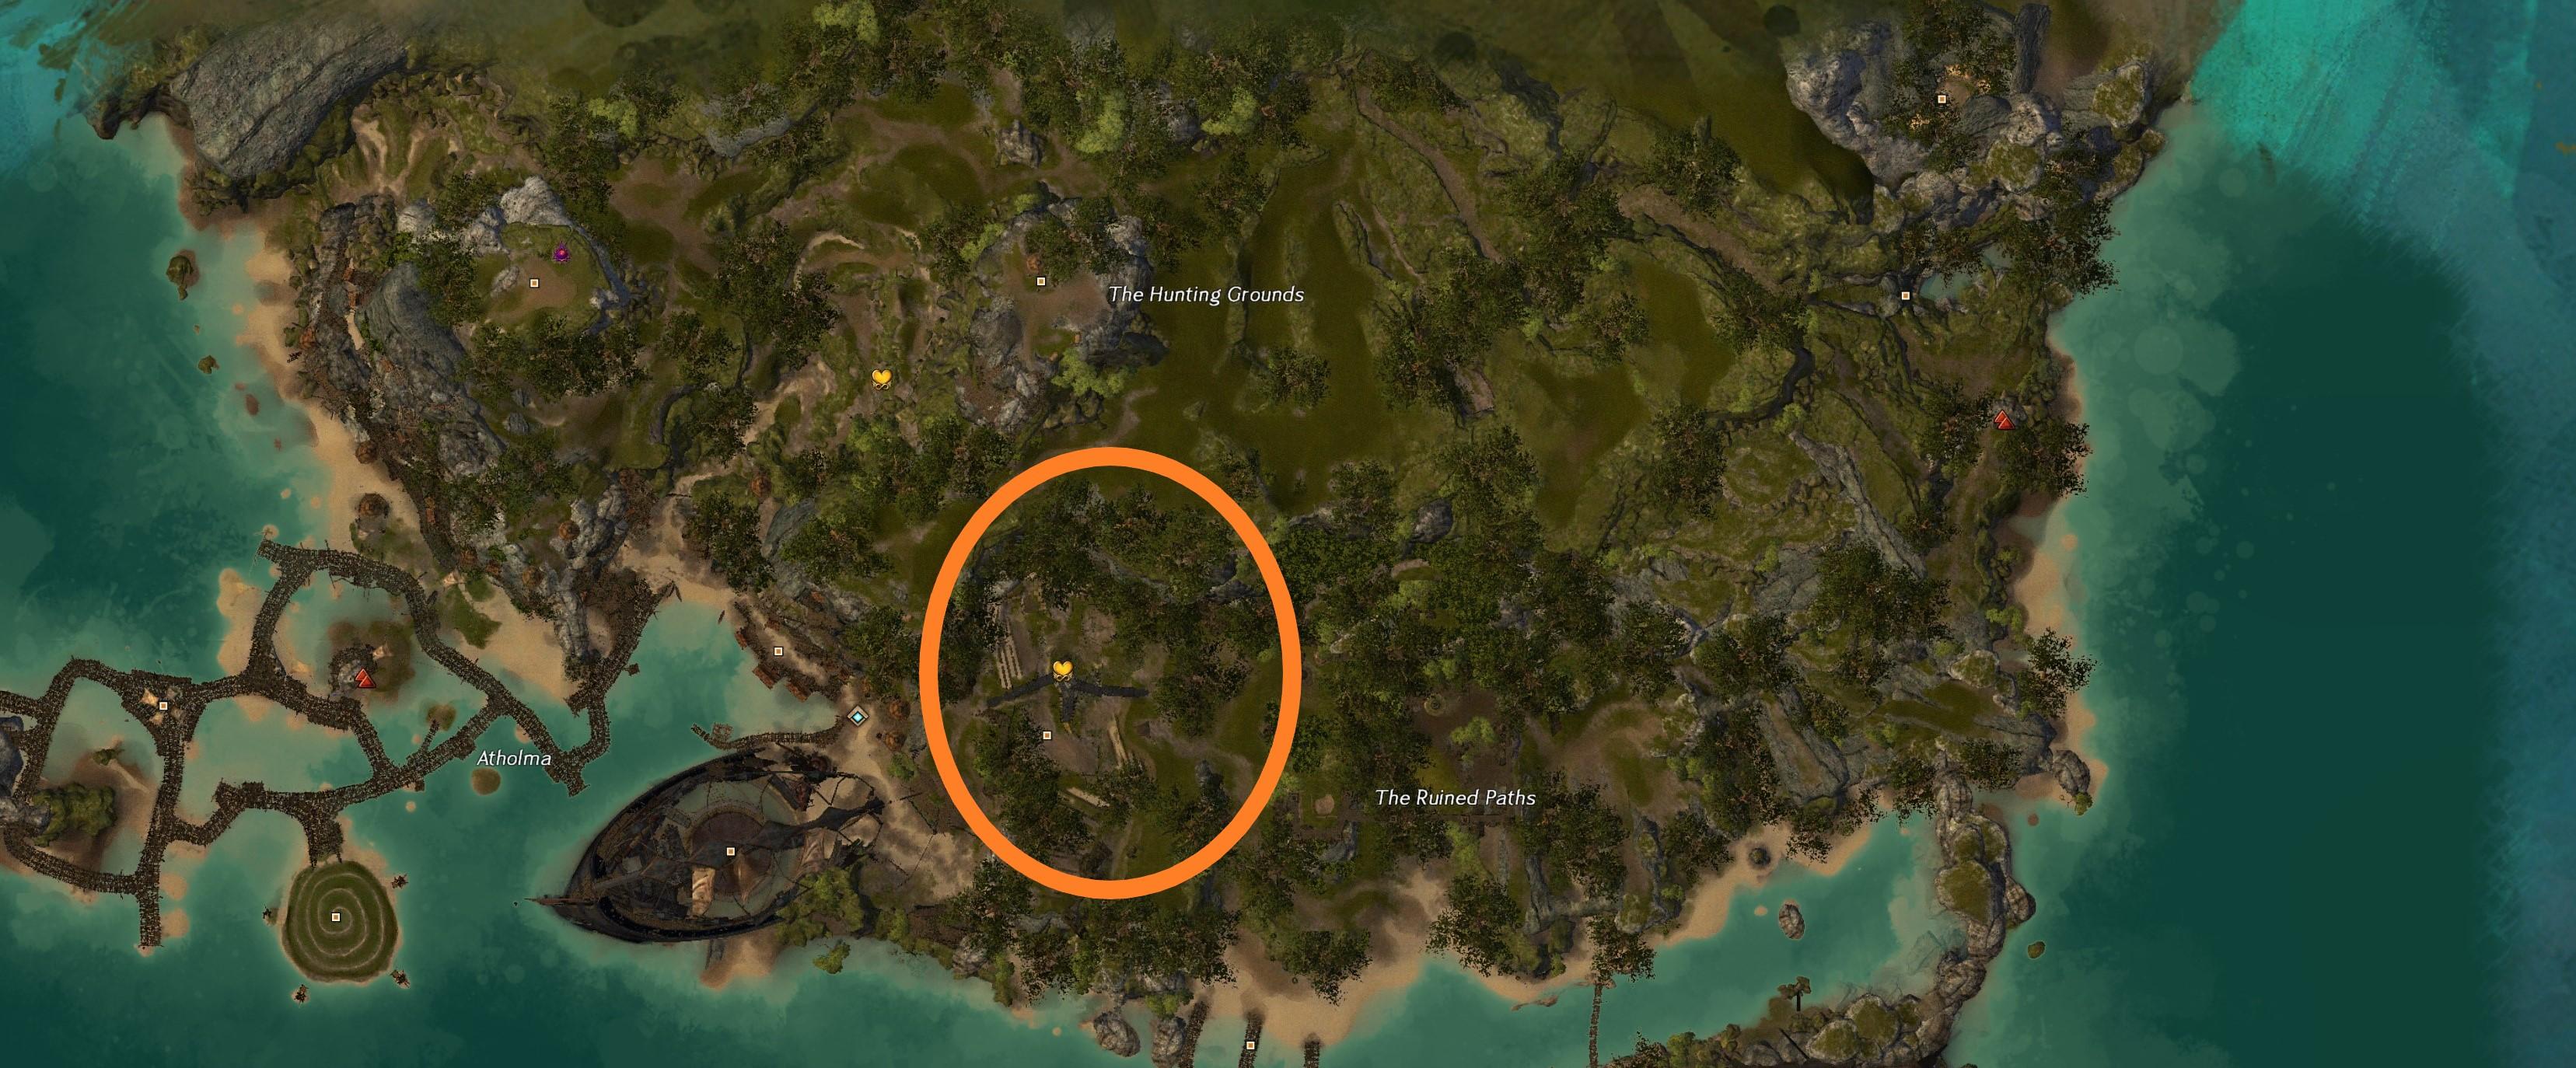
Phase Two
- Defeat champion elementals
Notes:
- Need a group
-
Three separate events
- At the center of each, there will be a counter-clockwise invisible black hole motion, pulling your character towards the center
- Orange circle = Locations
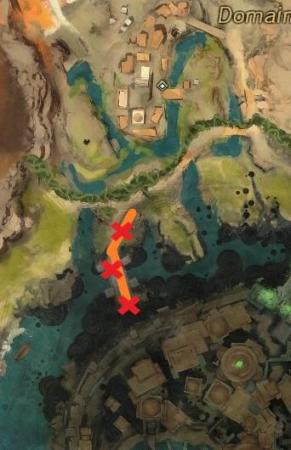
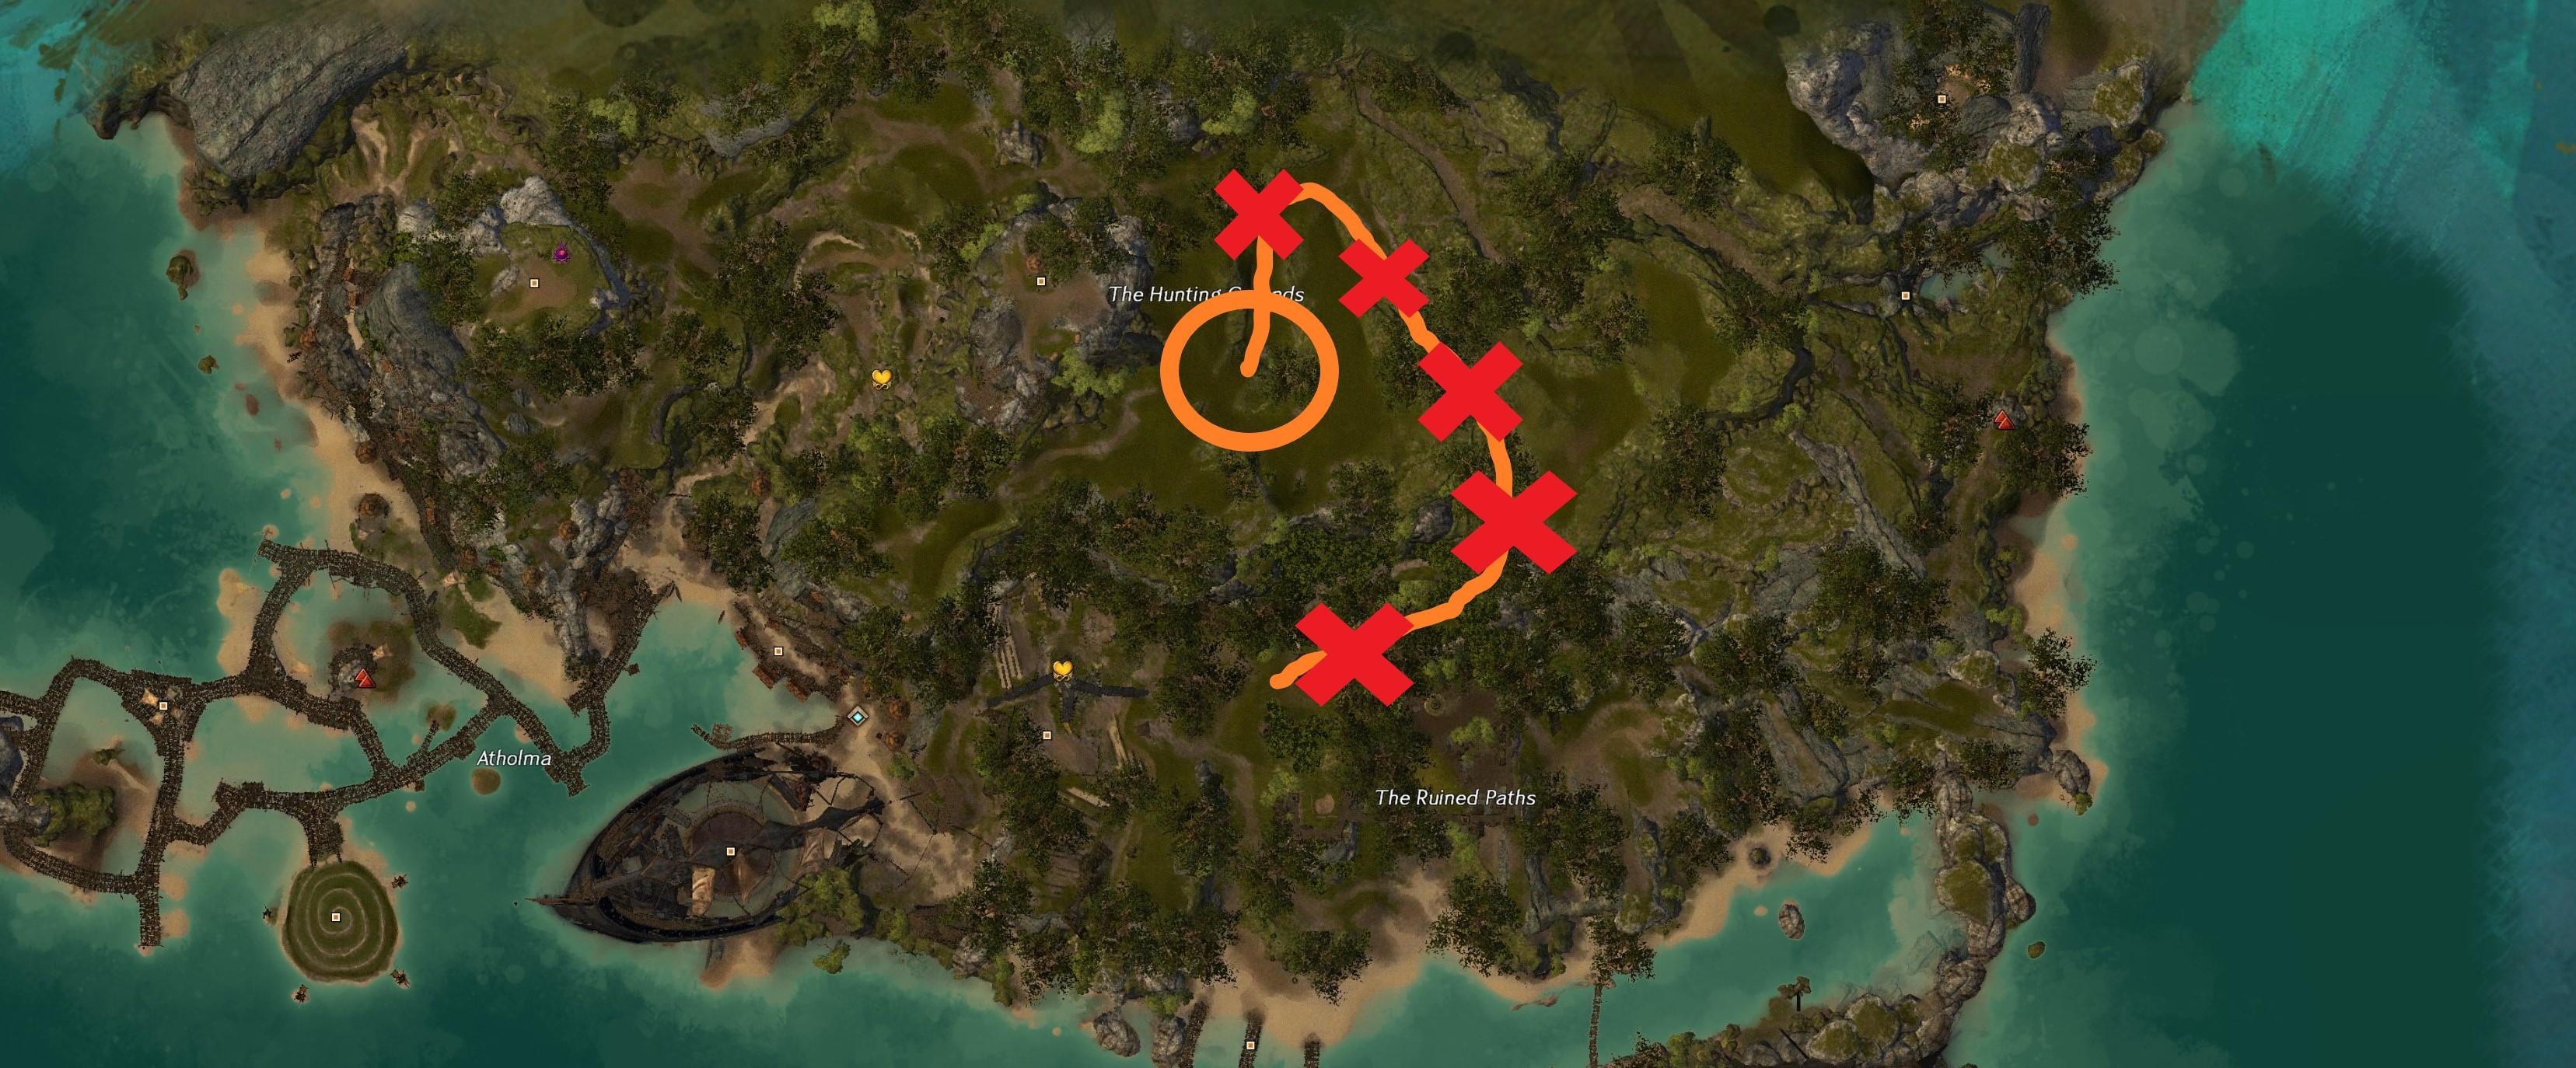
Phase Three
- Escort NPCs
Notes:
- Scales incredibly easy, expect champions
-
Escort pauses 6 times to fight mobs
- Last pause will have at least one champion guaranteed, regardless of scale
- Red X = Location of pauses
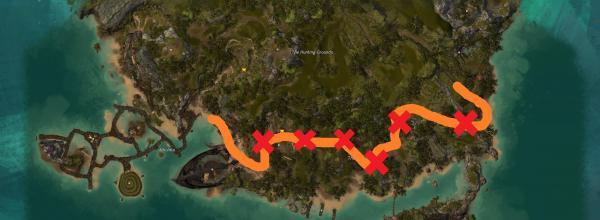
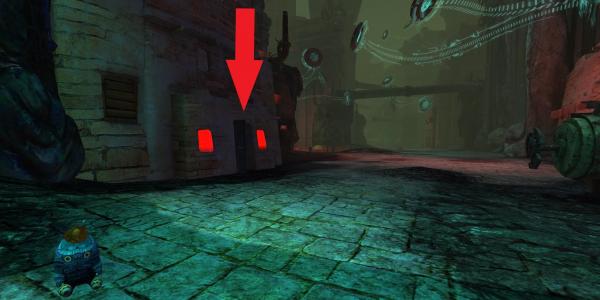
Phase Four
- Defeat Zohaqan
Notes:
- Melee him, even if you use range weapons
- Boss does incredible range damage
- Slow, chills melee characters
-
Boss contains armor. Break his bar to get rid of his defense
- Counter: Bring condition cleanse and CC
- Red arrow = Stand here (left, respect to how you entered the room) to prevent your character from getting locked into the end reward chest
Loot / Gathering Phase
Information:
-
Several "Sunken Chests" and Driftwood will be all around the beach
-
Sunken chests
- 10 VM
- 2 Unidentified gear
- Possible Spirit Shard
- Possible Difluorite Crystal
-
Driftwood
- Elder wood
- Foxfire Clusters
-
Sunken chests
Here are the possible locations:

Rewarding Events
SpoilerInformation:
- These events give bonus loot upon completion or just give a great amount of loot in general
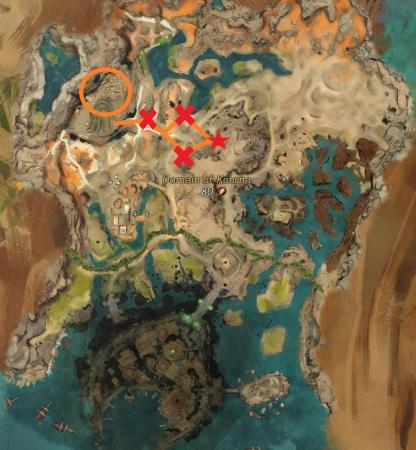
Defeat Dominus Crystallum
SpoilerInformation:
- Guaranteed 5 Difluorite crystals (once per character)
Boss:
- Does melee attacks
- Shock waves
- Goes invulnerable at 66% and 33% to throw down fire
Counter:
- Flank
- CC
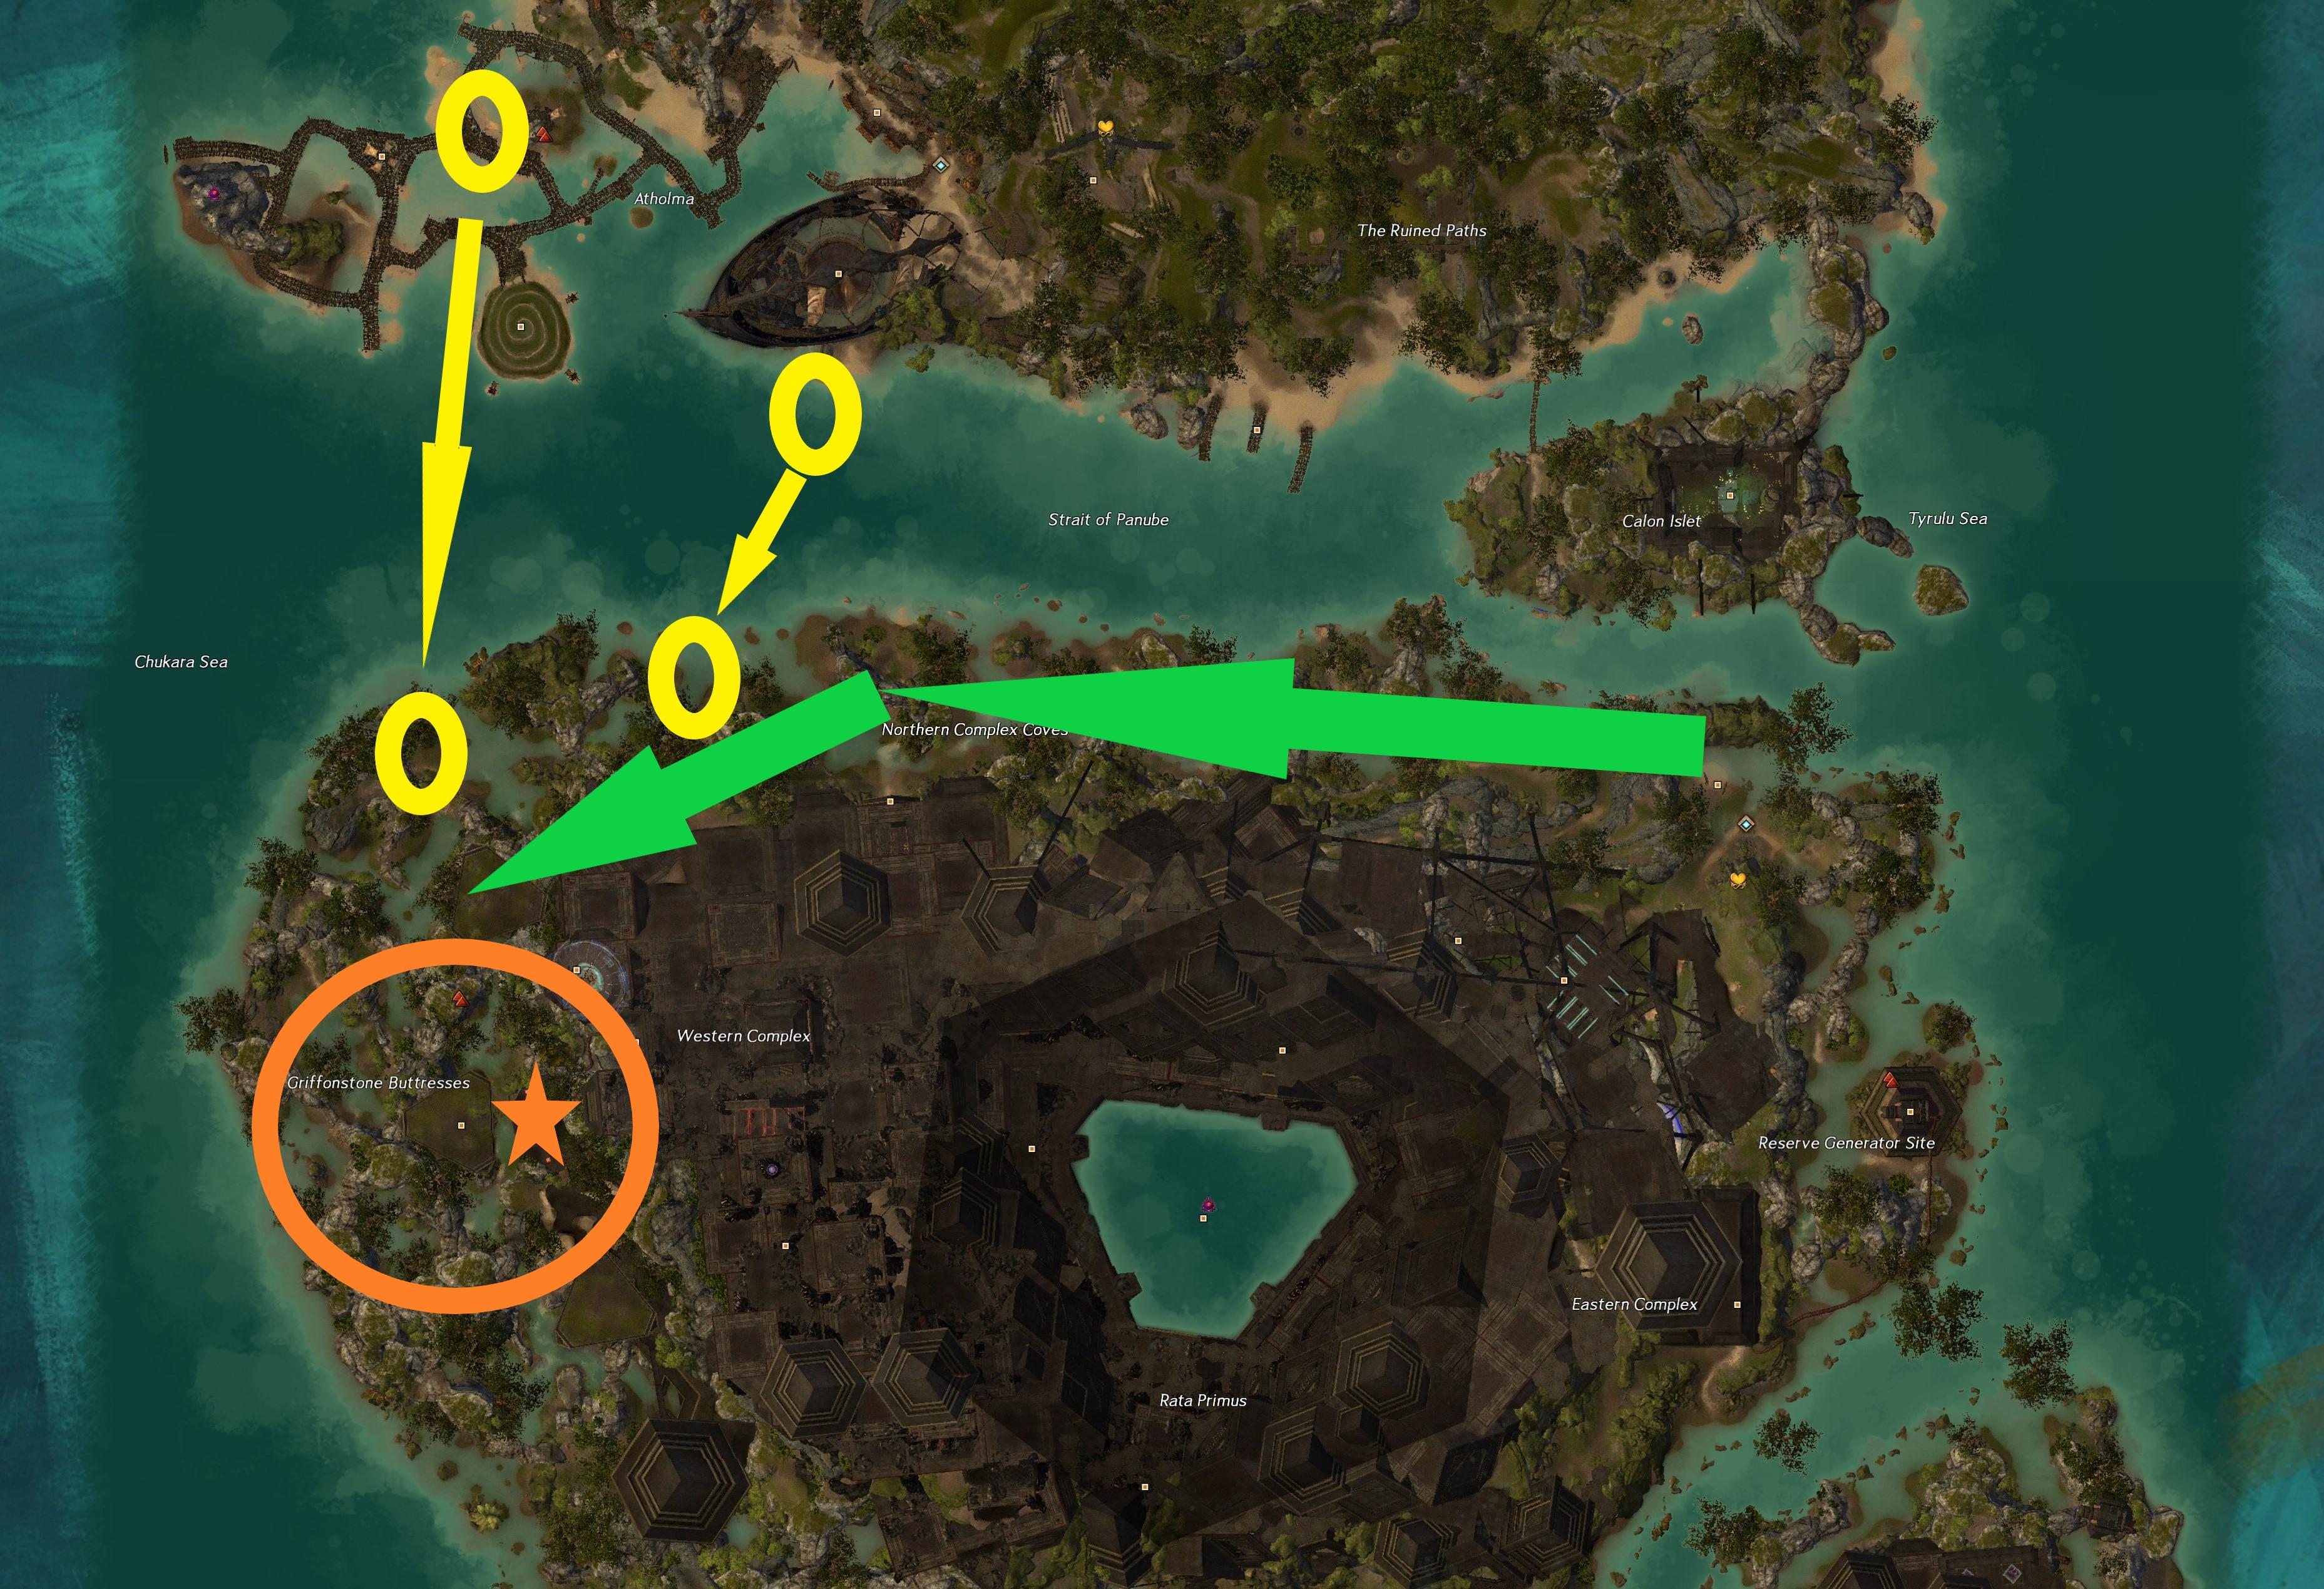
How to get to him:
- Yellow circle = Jackal portal
- Green arrow = General direction if running by foot
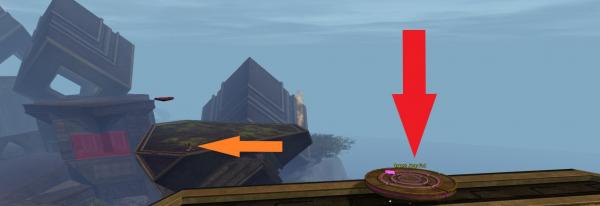
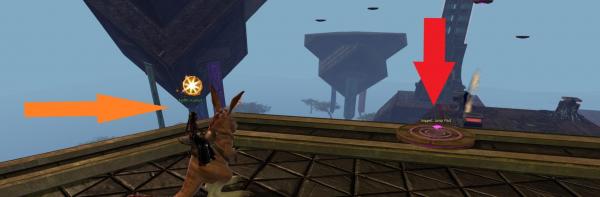
- Orange circle = Event location
-
Orange star = Jump pad location
- Take multiple jump pads to reach the NPC where you speak to start the event and back to the actual event location

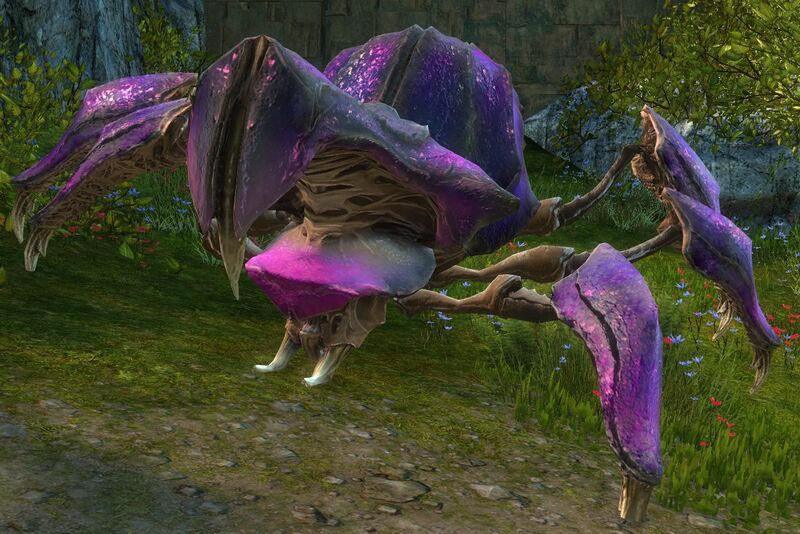
Beetle Queen Event Chain
SpoilerInformation:
-
Four events in whole chain, but does not necessarily have to be done in order
-
Have at least Event 1 of the chain completed to start Event 2 and/or 3
- Four event comes after the third only
-
Have at least Event 1 of the chain completed to start Event 2 and/or 3
- Guaranteed 5 Difluorite Crystals for killing the Beetle Queen
- Events 2, 3 provides lots of mobs, loot, volatile magic
Event 1
- Mount up and spank marmoxes using your special action key

Event 2
-
Escort NPC to the camp
- Red X = Pauses where mobs spawn
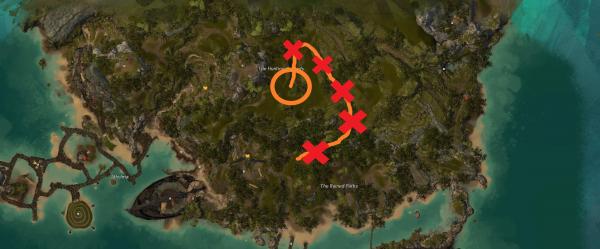
Event 3
- Defend camp from swamps of Scarabs
- Group is recommended
- 3 waves

Event 4
Boss:
- Uses melee attacks
- Charges in front
- Easy breakable CC bar
- Occasionally blocks around her, but not in front
Counter:
- Melee and flank
- Attack in front if blocking
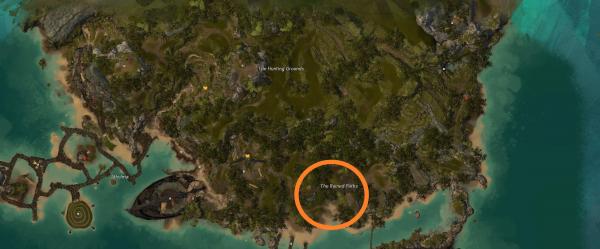
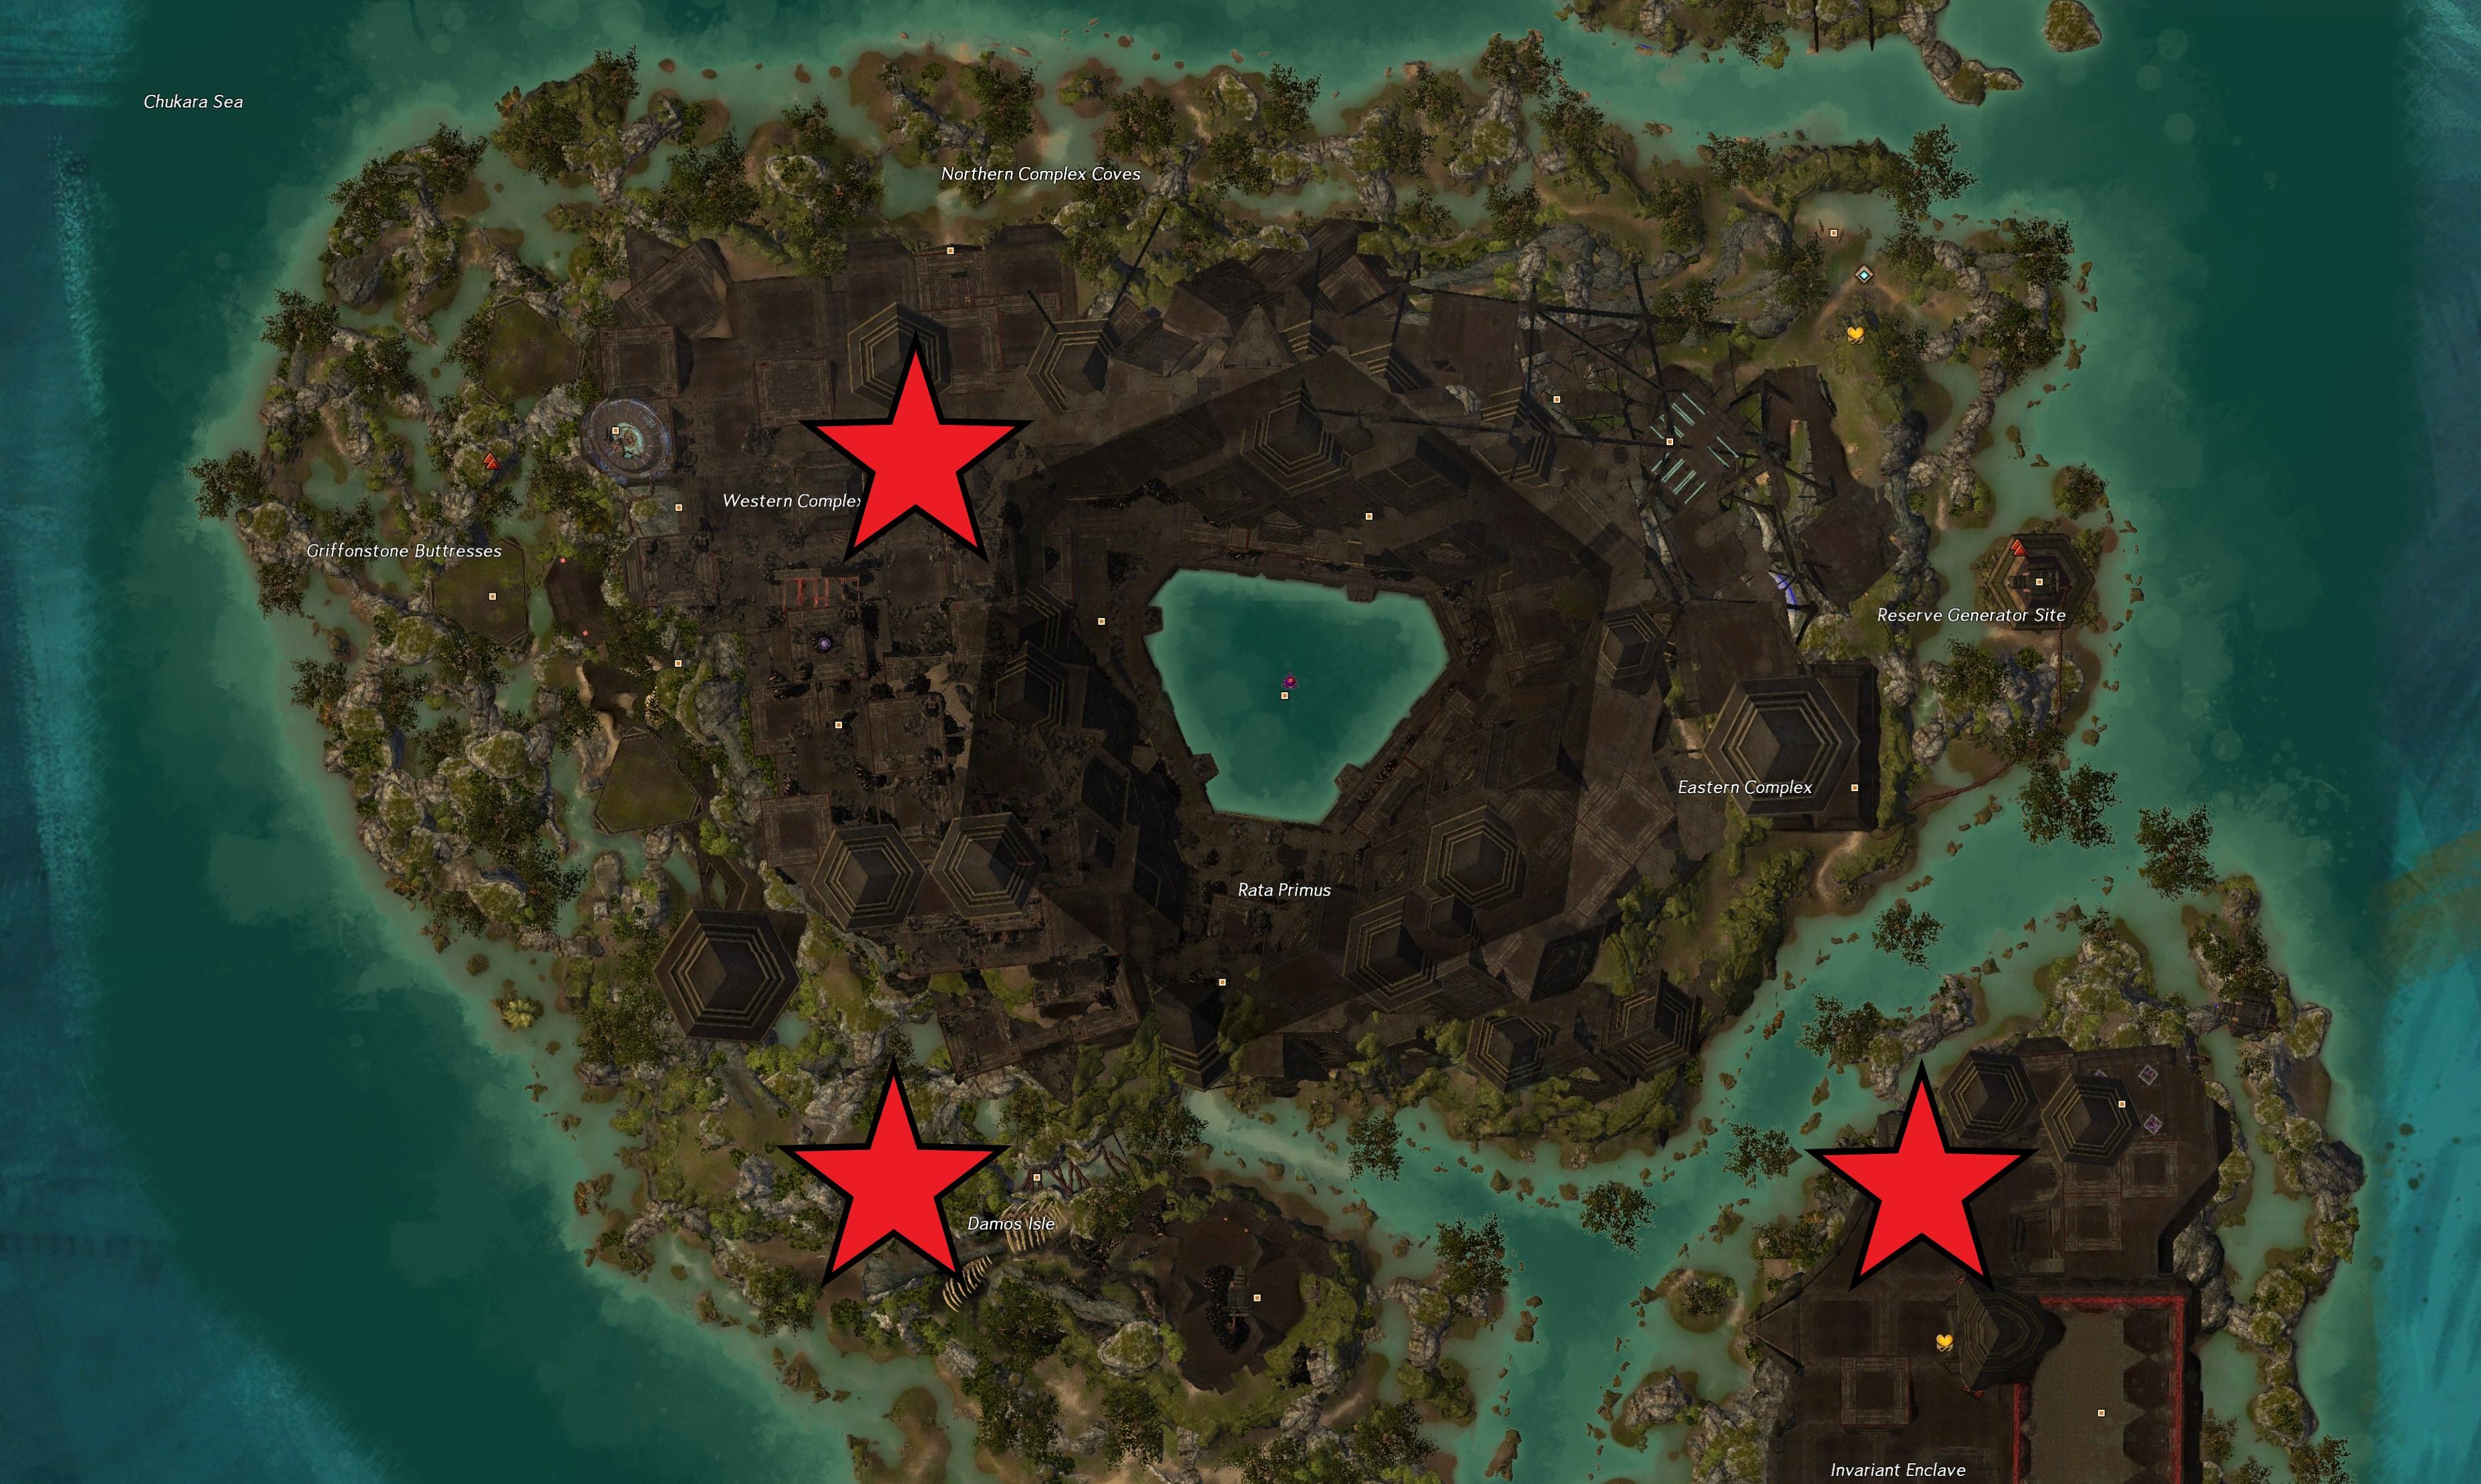
Mark Golem III
SpoilerInformation:
-
Three separate possible locations
- Red Star = Possible locations
- Guaranteed 5 Difluorite Crystals upon defeat
- Acts the same as the World Boss - Golem
Boss:
- Lots of aoes around boss
- Shock waves
Counter:
- Melee
- Dodge when notice a telegraphed aoe below you

Bounties
SpoilerInformation:
- 2 legendary bounties
-
Most bounties can be done quickly (less than 2 minutes) with a good group
-
List of evil bounties:
- Exterminator IG-04
-
List of evil bounties:
-
In Excel Sheet below
-
Bag type:
- Normal = Pre PoF champ bag containing identified gear
- Good = Post PoF champ bag containing unidentified gear
-
Bag type:

Legendary Starcaller
Information:
- Hydra
-
Chance to drop rare minis
- Mini Frost Hydra Head
- Mini Fire Hydra Head
-
Mini Lightning Hydra Head
- Check prices from wiki/GW2spidy (you'll like what you see)
Boss:
- Charges in front
- Throws lasers in front
- Meteor shower, stuns players
Counter:
- Flank
- Dodge when evil telegraphs spawn below your feet
Legendary Seneb the Desecrated
Boss:
- Charges
- Melee attacks
- Damaging aoes
- Poisons foes
Counter:
- Flank
- Range
- Condition cleanse
3. Domain of Kourna
Spoiler
Domain of Kourna
Pros:
- Easily solo-able
- Fastest meta in the game
- Easy, in general
- High VM availability
- Very high amount of events + low cooldowns
Cons:
- Some event mobs do not give loot
- Super simple meta (this could be a pro depending on how you look at it)
Unique Items:
- Inscribed Shards
-
Plaguedoctor Stat (Vitality, Condition Damage, Concentration, Healing Power)
- Ascended trinkets
- Armor recipies, insignia, inscriptions
- Ascended backpiece (achievements)
To Earn Good Profit:
- Do the Meta every time it's up
- Do Rewarding Events (mobs that actually drop loot) in between meta cooldowns
- Do Recommended Bounties in between everything else
- Gather all caches throughout the map
-
Consume excess Inscribed Shards
- Use VM in exchange for Trophy Shipments at the VM Vendor
The Meta
1. Containing the Scarab Plague
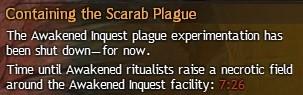
SpoilerContaining the Scarab Plague
Information:
- Easily solo-able
- Takes about 15 minutes to complete
- No limit on boss chest / end rewards
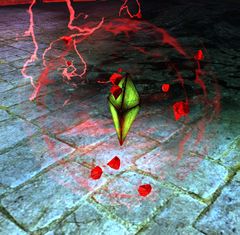
-
No global cooldown, unique to instance
- 10 minute cooldown after timer has run out
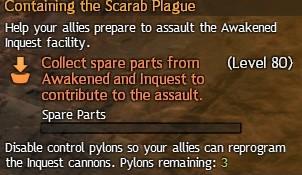
How to start it:
- Defeat 3 pylons throughout the map (explained in Phase 1)
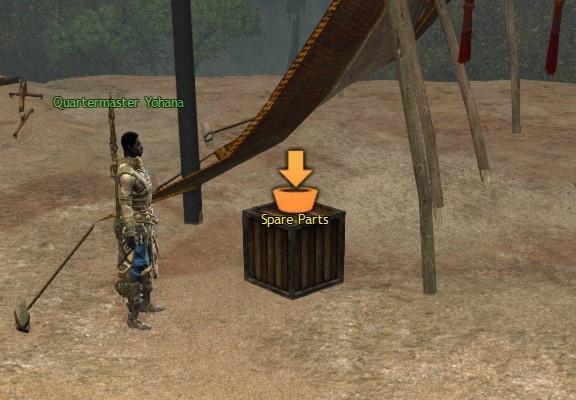
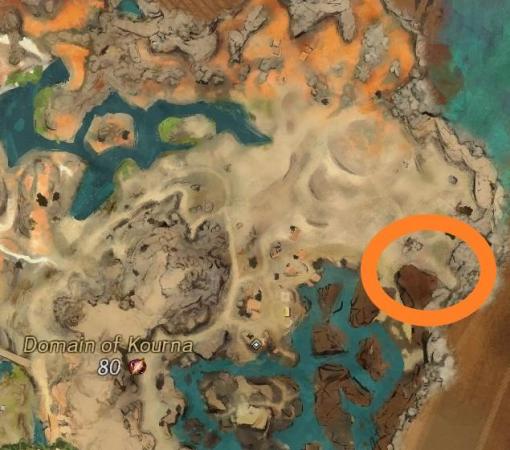
-
Turn in as many Spare Parts as possible to complete the bar
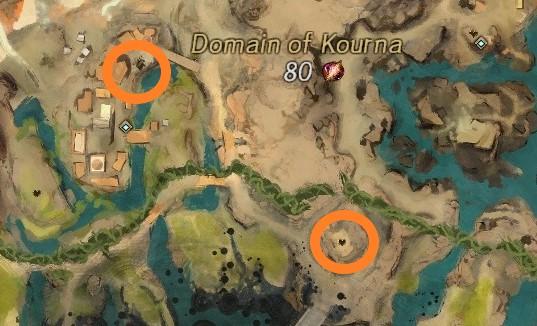
- Orange circle = Locations to turn in Spare Parts
This meta has 6 phases:
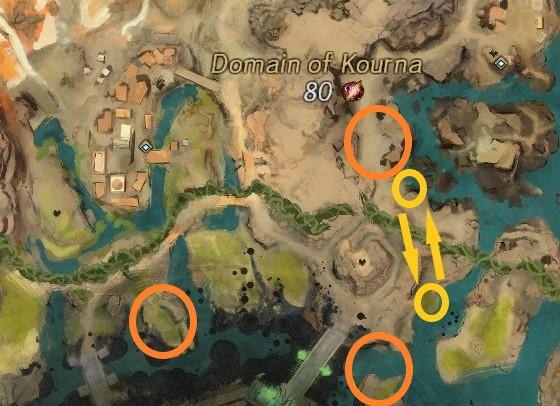
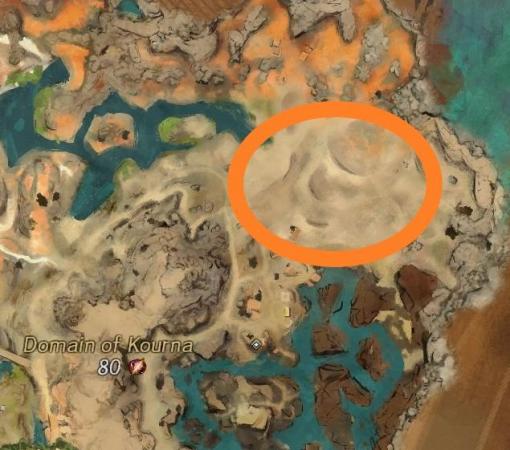
Phase 1
-
As explained in "How to start it", defeat 3 pylons throughout the map
- Orange circle = Locations
- Turn in as many spare parts as possible to complete the bar
-
Next phase will not start if there is a "Disable the Awakened Inquest Cannon" already up
- Indicated on a mini map with a orange battery symbol
Notes:
-
Pylons do not scale up and have low health pool
- Orange circle = Locations
- Yellow circle = Jackal portals
- Mobs drop loot
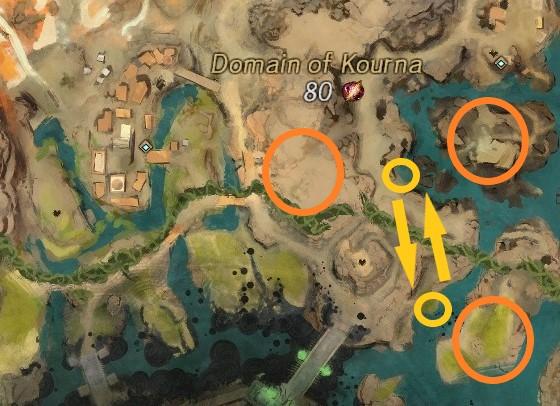
Phase 2
-
Defend 3 cannons separately and simultaneously for 4 minutes
- Orange circle = Locations
- Yellow circle = Jackal portals
Notes:
- Mobs do not drop loot or experience
- South-most cannon starts 20 seconds earlier than the other two cannons
Phase 3
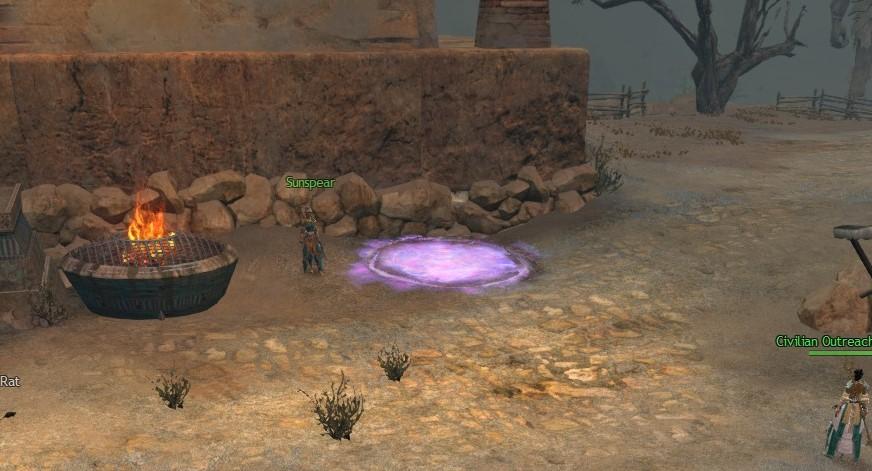
- Infiltrate Gandara, the Moon Fortress by defending 3 rally points
Notes:
-
Waypoint to Allied Encampment Waypoint — [&BFcLAAA=]
-
Head slightly west to a portal
- Teleports players directly to the meta
-
Head slightly west to a portal
-
Each successful completed rally point will grant a chest at the middle of the rally point
- Orange circle = Rally points
- Last successful rally point will grant 4 loot chests with a total of 6 all together
- A single mob will stop progress if it is inside the rally point
- Mobs do not drop loot


Phase 4
- Defeat Inquest boss
Boss:
-
Two separate bosses
-
Inquest boss
- Potential high burst damage
-
Golem Boss
- One-shot high burst single target damage
-
Goes invulnerable every 25%
-
Summons Necrotic Distillate
- Very quickly defeats players if not destroyed by spawning large pulsing aoe
-
-
Summons Necrotic Distillate
-
Inquest boss
Counter:
- High DPS
- Melee
- Destroy Necrotic Distillate when spawned
Notes:
- Takes 3-5 minutes to kill bosses
-
Inquest boss spawns with 10% health again after defeating the golem at the same location
- Tag to receive two champ bags
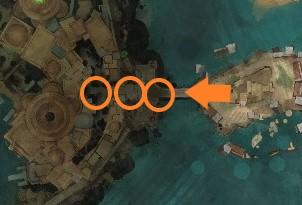
Phase 5
-
Destroy 11 Plague Experiments
- Orange gear = Locations

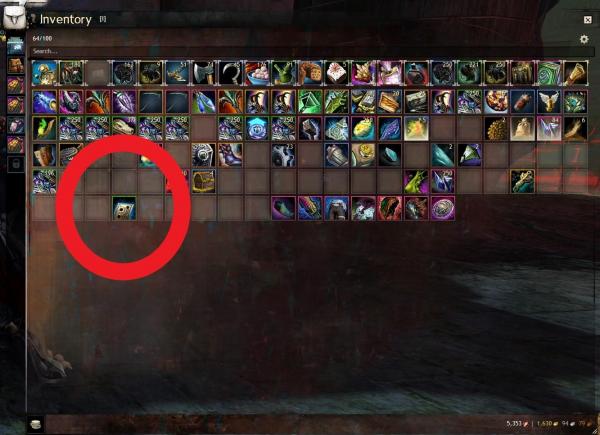
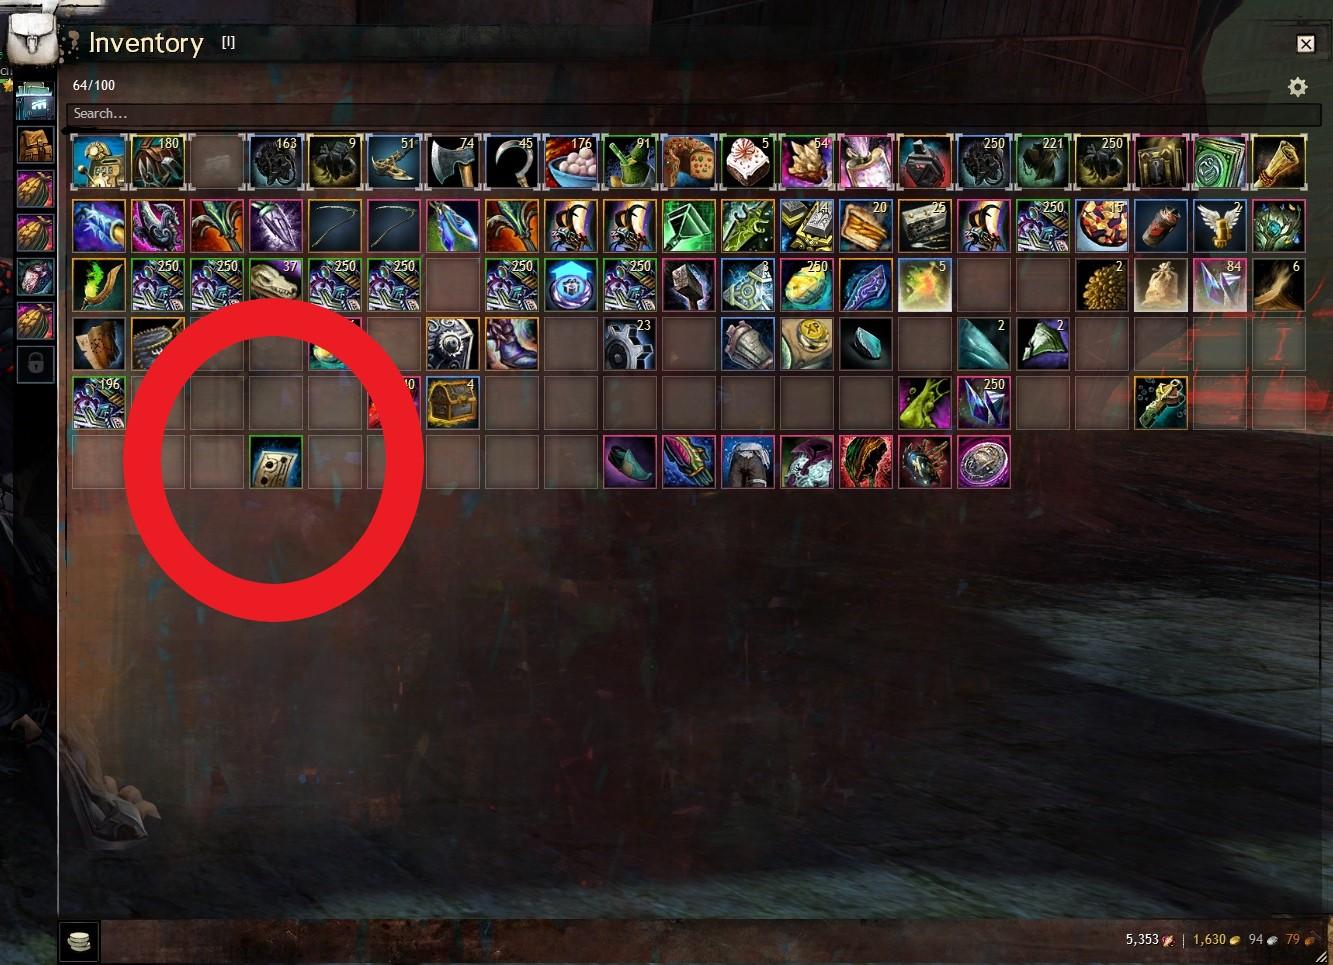
Loot Phase
-
Use Access Card in inventory
-
Run to red arrow on map below (to the left of the boss chest, same area as fighting the Golem boss)
- Profit
-
Run to red arrow on map below (to the left of the boss chest, same area as fighting the Golem boss)
Rewarding Events
SpoilerInformation:
-
These events are deemed "rewarding" because these actually give loot compared to some events on this map that do not
- Fast respawn rate
- Most events have an Orange Tangerine symbol above the NPC's head and on the mini map to indicate an event is ready to begin (need interaction)
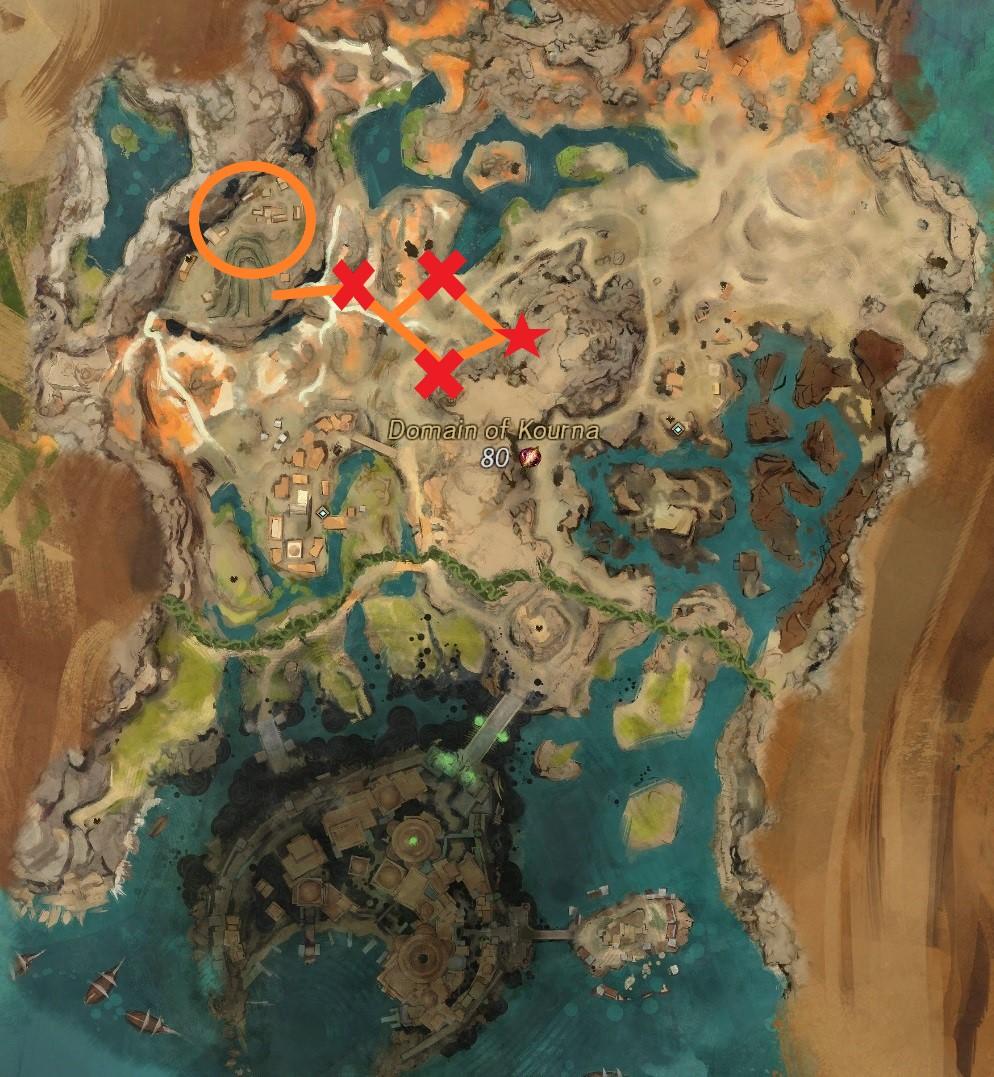
Researcher Escorts (3)
SpoilerResearcher Emm
Information:
-
2 events
-
Kill Mutated Rats
- Left-most orange circle = Location
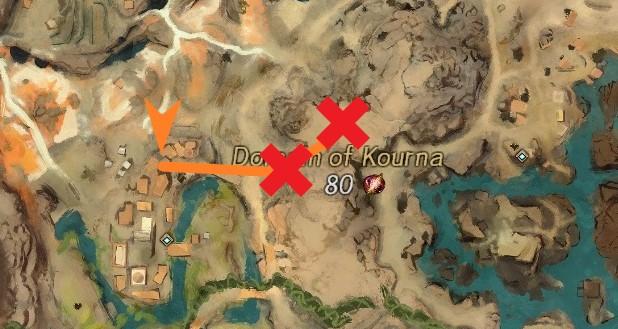
-
Escort Researcher Emm
-
Orange trail = Escort path
- Can have two possible paths
- Red X = Defend from mobs
- Red Star = End Point
- Unlocks hidden POI
-
Orange trail = Escort path
-
Kill Mutated Rats
-
Grants a lot of VM and loot from mobs
-
Faster you kill, faster they spawn
- Tip: Stay next to the NPC because mobs always run towards it
-
Faster you kill, faster they spawn
- Could scale to champion Shelks or Bats
- End of path contains 1-2 Kournan chests (once per character)
Researcher Siris
Information:
- Orange trail = NPC path
-
Red X = Defense
- First defense, mobs do not give loot
- Second defense, mobs give loot
- Does not scale up besides their levels

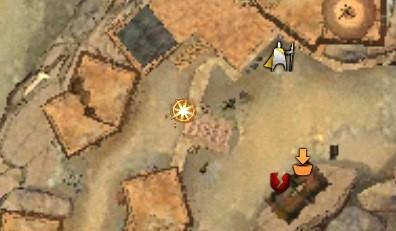
Researcher Maggin
Information:
- Orange trail = NPC path
- Red X = Defense
- Does scale up to spawn champion(s)
- Always spawns champion Golem, does not give loot
- End of path contains 2-3 Kournan chests (once per character)
Cannons
SpoilerInformation:
- Instead of defending, players are destroying the cannons
-
3 separate locations (one at a time)
- Orange circle = Location
- Yellow circle = Jackal portal
- Scales up for champions
-
Time limit
- Defeat before cannon fully charges
- Mobs give loot
Champion Shark
SpoilerInformation:
-
Gives good champ bag
- Unidentified gear
- Low health pool
- Orange circle = General location
Veteran Choya
SpoilerInformation:
- Low health pool
- Quick and easy event
-
2 Kournan chests next to event spawn (once per character)
- On the hills, next to the event spawn
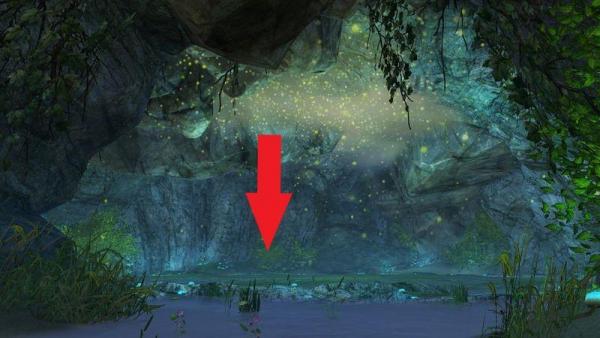
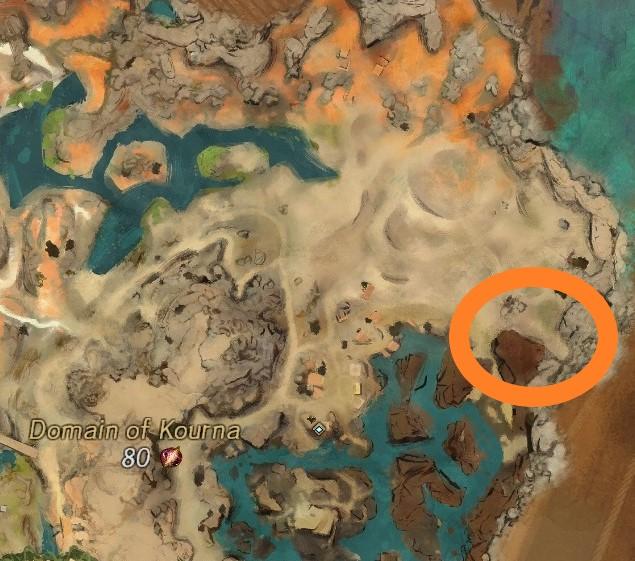
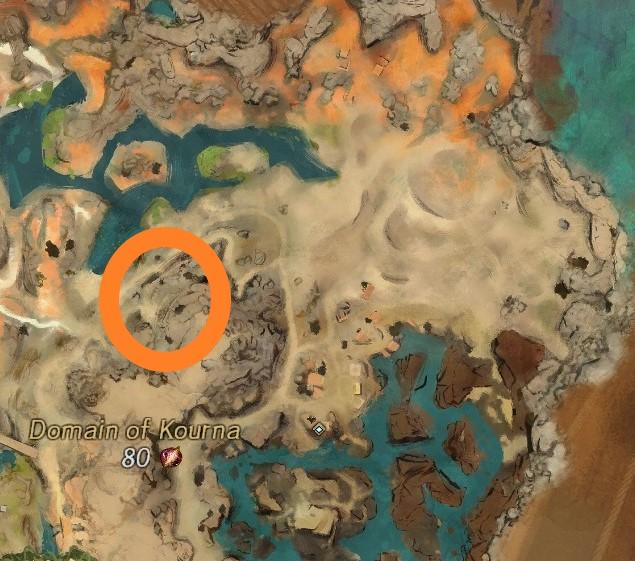
Awakened Inquest Lab
SpoilerInformation:
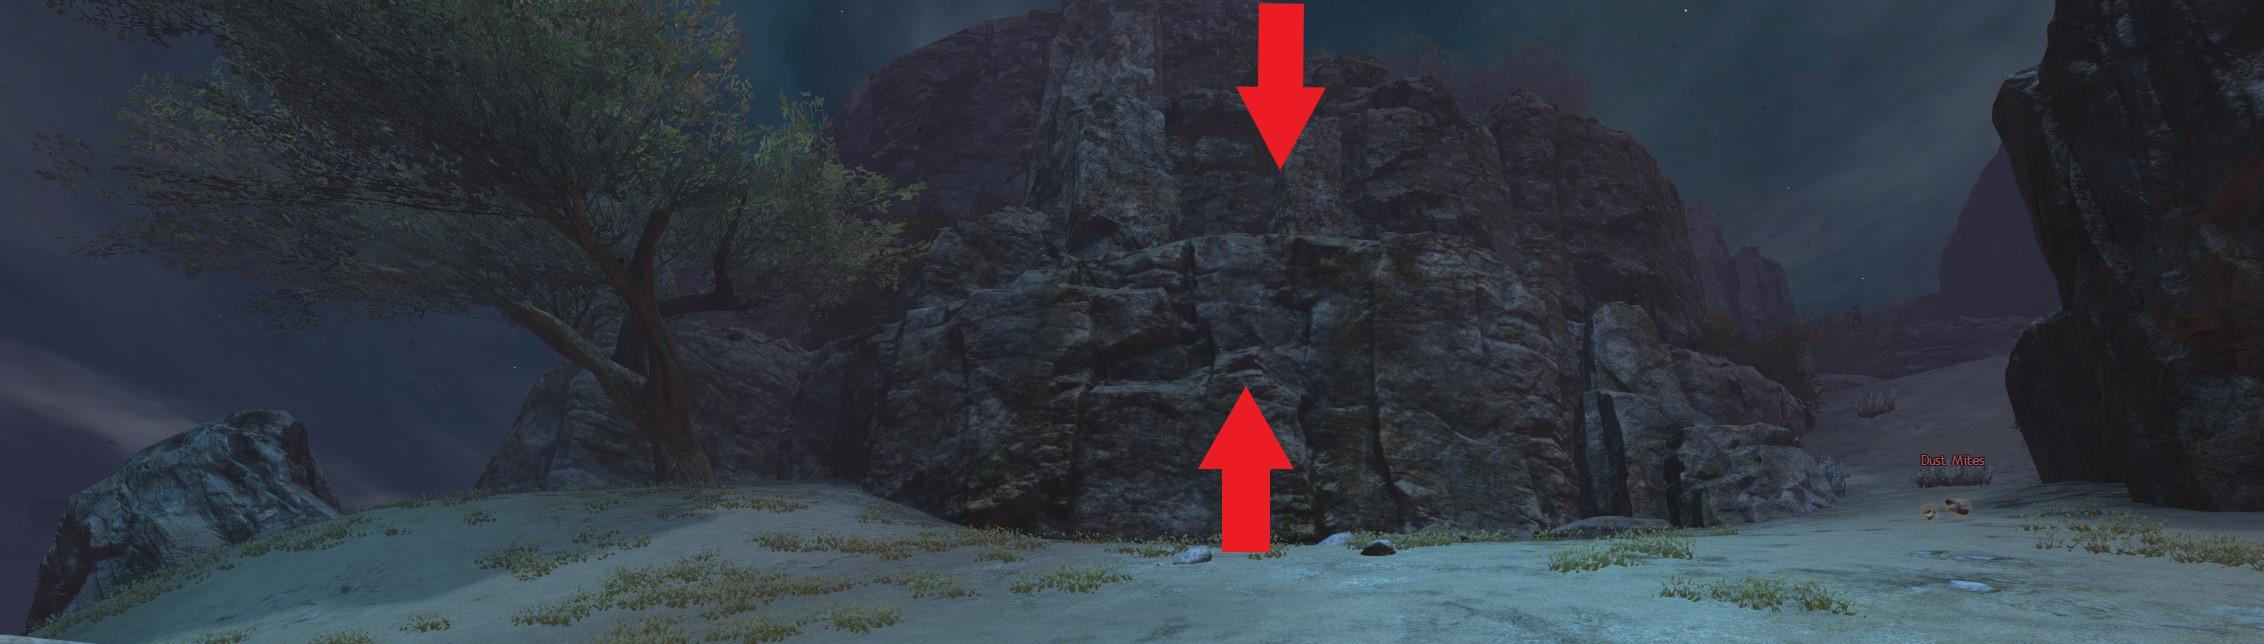
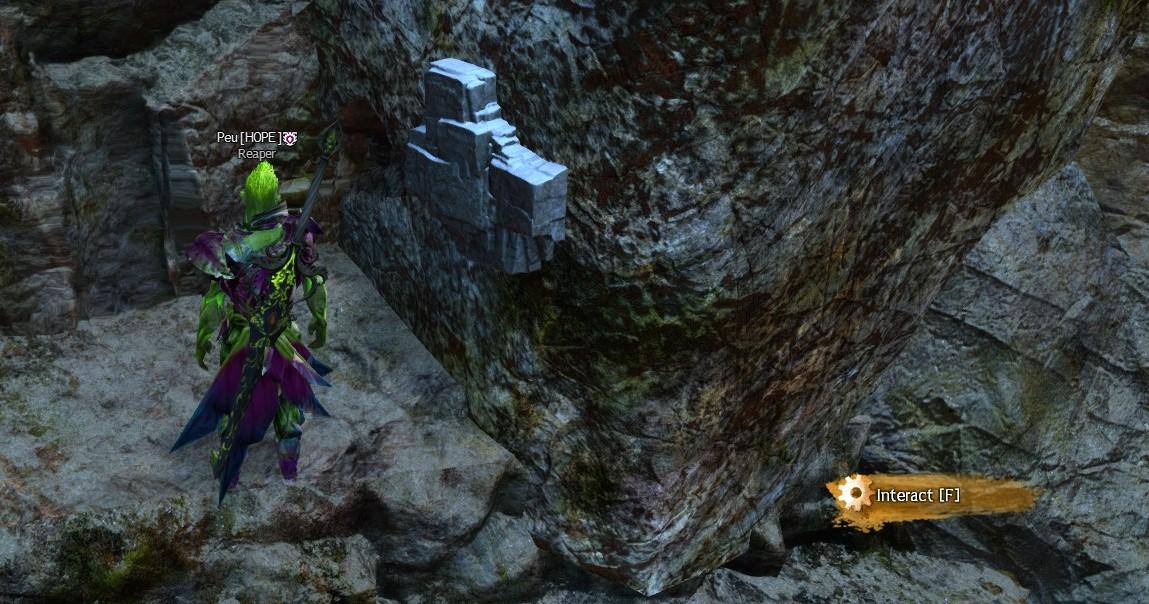
- Does not spawn unless a player interacts with entrance to a cave
-
Look for unusual looking wall (like a force field)
-
Interact with the wall (if you can't, event is not up yet)
- Orange circle = Location
- Red arrow = Location to Bunny up
-
Interact with the wall (if you can't, event is not up yet)
- Super easy event
- Hidden POI
- 2 Kournan chests (once per character)


Bounties
SpoilerInformation:
- All bounties are relatively easy
- Need a decent group to be effective
Recommended Bounties:
- Legendary Troopmarshal
- Aspohodel
- Cabochon
Legendary Troopmarshal
Boss:
- Melee attacks
- Pulsing aoes with conditions
- Knock back players (may take falling damage)
- Summons plenty of Awakened mobs
Counter:
- Flanking, melee
- Should not range too far
Kournan Caches
Spoiler4. Jahai Bluffs (WIP)
SpoilerWIP
5. Thunderhead Peaks (WIP)
SpoilerWIP
6. TBA
SpoilerTBA
-
 1
1
-
 2
2
-
 1
1
-
Yeah the fractal is cool. I duo-ed it with a friend yesterday. It just felt really short.
-
I won't be on that much during patch day and Wednesday. I'll be available all of Thursday..but I can try my best to hit you up when you're online
-
1
-
-
Yay congrats guys!!
-
1
-


LS4 Maps
in Maps: In-Depth Information and Guides
Posted
Glad you love it! More to come soon!