


Deyna
-
Posts
1680 -
Joined
-
Days Won
1
Content Type
Profiles
Forums
Gallery
Events
Posts posted by Deyna
-
-
I'm pretty much decided on scorching ray for this league. since it looks like you always spawn in the middle of the battle, being able to tag everything you need with a single pass seems...broken.
Now I just need to look up a good build for it. but @Lagerfueled, 4 curse bane occ is what I played in synth...absolutely a blast to play.
my build was this:
Spoileruniques: Vixen's Entrapment, Cane of Unravelling
gem links:
[bane, despair] and [soulrend, energy leech] get swapped between the two six-links.
[void manip, efficacy, controlled destruction, empower] in the staff.
[void manip, efficacy, controlled destruction, swift affliction] in the chest.
bane in the staff for maps, SR in the staff for bosses.
[Enfeeble, temp chains, poacher's mark, portal gem] in the vixen's entrapment gloves, so that you get 4 curses with every bane cast: 1 naturally, 1 from vixens, 1 from passive tree, 1 from occ ascendancy. links dont matter here.
[Enlighten, Discipline, Malevolence, Purity of Elements] in either boots or helm. I prefer purity over clarity since I never had MP regen issues, but I also prioritized mp regen for gear. make sure to pick up the reduced mana reserved nodes in case you cant get your hands on an enlighten gem.
if you want a movement skill then leap slam is probably the way to go, but I had a ton of movespeed so I didnt think it was necessary and used my other 4 slot to level backup gems of bane, soulrend, discipline, and purity just in case I bricked one with a vaal orb.
lvl 70 tree:
Spoiler
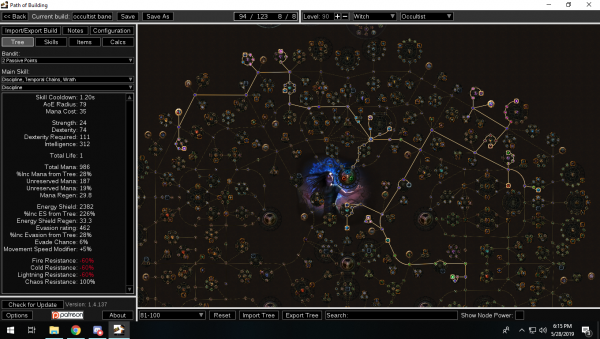
node priority: Growth and Decay, Atrophy, Unnatural Calm, Corruption, Hex Master.
lvl. 90 tree:
Spoiler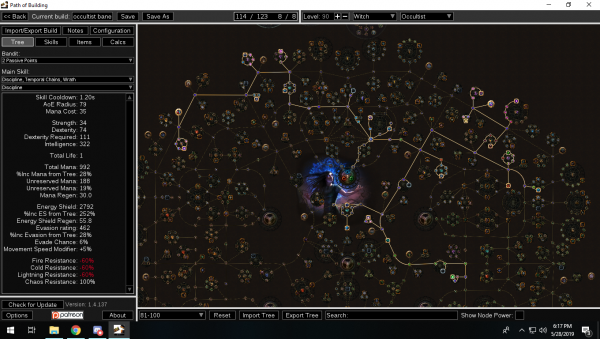
remember, if you are using purity instead of clarity, increasing the effect of your auras gives both ES and ele res. with a lvl 20 purity gem and this tree, you are looking at about 42% all res from that aura.
-
 1
1
-
-
Hey!
the Pantheon devs are having two streams!
The first is on August 5th, which is a typical Cohh stream that they have done in the past: they will showcase some new stuff they did, talk about the progress they made, and likely run one of the non-instanced dungeons that they are working on. If you have never seen a pantheon stream before, make sure to get this one: its a basic overview of things to come. link for announcement: https://clips.twitch.tv/CuriousTrustworthyToothSMOrc
The second is an unprecedented event that the devs have allowed: they are letting five streamers on to their game, and pretty much telling them to have fun. this will be the first stream we see that is not guided by the devs: quite simply, its just five guys getting together having fun. I am super excited for this, and I know if youre an old-school MMO vet like myself, that makes you excited too! since this is a lot more unofficial, here is the reddit post with an announcement for it: https://www.reddit.com/r/PantheonMMO/comments/92fzzy/pantheon_mmo_dream_team_stream_august_6th_630_pst/
Thats it for now, but I'm still super excited! this is going to be a long week to wait...
-
 1
1
-
2
-
-
38 minutes ago, Maeric said:
I will be a Bard, and never look back. I mained a Bard in EverQuest and have missed the class ever since.
I could not be more excited to make one in Pantheon lol.
~M~
Sadly I dont think there will be a bard on release.
-
 1
1
-
-
Hello, and welcome to Deyna's PvP 101 guide! This is a guide intended as a primer for PvP, including basic mechanics and terminology, and general knowledge for anyone interested in the game format but have exactly zero idea of where to start. Well, you found a perfect starting spot! As a note, this guide is intended to be a basic primer that will not require consistent updates, and as such, will not include FotM/Meta builds. This guide is also for conquest, the most supported game type for PvP, and will also not cover the finer details of stronghold or deathmatch.
Basic differences from PvE and WvW:
-
You retain a separate skillset from PvE and WvW and can be changed by entering the Heart of the Mists.
-
All levels are normalized to lvl 80 and all stats are normalized per class. This means that a level 1 character that is freshly made will be on an even footing as a lvl 80 in full ascended gear of the same class.
-
While teams of 10v10 are supported through custom rooms and practice rooms, the arenas feature 5v5 matches only.
The first question in PvP:
The first question in any competitive setting, whether it be this or playing checkers with a friend, is always the same: How do I win? In GW2 PvP, you win by having your team reach 500 points first in a 15 minute time limit. If time expires before 500 points is reached, then whichever team has the higher point total wins. If both teams are tied for points, then higher kills wins. If both teams have equal kills, than higher damage output wins. In my nearly 7500 matches, I have only seen the damage output tiebreaker used once, so if there is a tiebreaker layer after that, I have not seen it. Most commonly, though, first to 500 will win.
Terminology used in PvP and in this guide:
Point – one of the three capture objectives on the map.
Home – The capture objective closest to your team's spawn.
Far – The capture objective farthest from your team's spawn.
Mid – The capture objective in the middle on the two spawn points.
Cap – capturing a point in your team's favor.
Decap – neutralizing an enemy point.
Backcap – capturing an enemy point after it has been abandoned.
Stomp – using a finisher to fully kill a downed foe.
Res – reviving an ally from downed state.
Hard Res – reviving an ally with basic channeling.
Skill Res – Using a class skill (e.g. battle standard) to revive an ally.
Rally – reviving an ally by killing a downed foe.
Stealth Res – reviving with a hard res under the cover of a steath skill (e.g. Shadow Refuge).
Spec – a build for a class that fits a specific archetype for what you are planning to do.
Bunker – A spec designed for healing, defense, and holding a point.
Breaker – A spec designed to take a bunker off point.
Getting Started:
To start, we need to enter the PvP lobby, which is accessible through the crossed swords icon in the upper-left of your screen. The PvP lobby is called Heart of the Mists, and has most of the functions of a town, except for a mystic forge and crafting stations. It also has an open brawling arena and a jumping puzzle, in addition to several secondary objectives from the various maps to practice.
While in Heart of the Mists, your PvP skills and equips will be active, and all of these can be changed at any time in HotM. Simply click the helmet in the top center of the screen and you will be able to change your weapons, sigils, rune set, and amulet at will. Keep in mind, that since all stats are normalized in PvP, your only source of extra stats come from the amulet you use and the rune set you pick. Choose wisely! The second tab in the helmet is your build, which can also be changed at any time, and includes the Elite specialization for your class whether you have it fully unlocked for PvE/WvW or not.
Clicking the crossed swords again (either at the top center or the top left) will bring up the PvP interface, which gives plenty of information about PvP: the first tab has buttons for joining ranked/unranked arena as well as your lifetime stats in PvP, the next tab shows current league standings and league rewards, the next shows tournaments and times for the next tournament to fire, the next has reward tracks for you to choose as you progress in PvP, and the last is a list of hot-join lobby rooms.
Your fashion that you picked will carry over into PvP, even if the stats from the armor do not. Because as we all know, making sure your character looks good is the true endgame in GW2.
Now that we are acquainted with the lobby and interface, and you have made a build for yourself, now we can jump into a map and start doing some PvP!
Scoring Points:
Remember, winning a match in PvP is dependent on getting your team to 500 first, so lets discuss how to do this. Each map in PvP will have three points: one close to your spawn, one close to enemy spawn, and one in the middle. For each point you hold, you will earn 1 point every 2 seconds it is held in your team's favor. Additionally, every time an enemy is killed, your team is given an additional 5 points. On some of the maps, a secondary objective will allow for your team to score bonus points, but we will go over the finer details of the individual maps later.
The basic strategy for conquest is to send a single, high mobility character to your home point, and send 4 people to mid point. This allows your team to start getting some score from your home point while a massive fight happens over mid. Occasionally, alternate starts are used: 2 home, 3 far is common, as well as 1 home, 3 mid, 1 far. Whichever strategy your team uses, the opening fight is important to attempt to win: some maps are extremely difficult to come back from behind just by nature of how they are laid out and their secondary objectives.
After the opening fight, communication is paramount: both teams have five players, and covering three points can stretch your team thin. If you see 4 people at a single point, then that means they have no one at one of the three points. Tell your team! Rotating between the three points effectively and decapping/backcapping your enemy is the key to victory: bashing your head against a wall of enemies on a point they own is a surefire way to lose. If they are sitting on the middle point with 4 people, then send 3 people to annihilate their sentry at the far point and hold the two sides against the middle. Are they trying to stretch for a 3-cap? Then set a bunker on your home point and rush the other two. Remember, holding two out of the three points is the easiest way to win, and choosing which two is all dependent on where the enemy currently is.
Game Modes and Potential Prizes:
Hotjoin Rooms are the basic PvP browser that is accesible from the last tab in the PvP interface. These rooms are either hosted by a specific person that purchased a room from the NPC Quaggan (Coo!) in the lobby, or static rooms created by anet with the basic parameters attached. Hotjoin rooms that do not have custom rulesets will earn you 15s and 500 rank points for a win, and give you 10s and 200 rank points for a loss. The amount of money you can earn in hotjoin rooms is capped at 5 gold daily.
Unranked Arena is a 5v5 match that can be joined from the first tab in the PvP interface. These Arena games can be entered solo or as a group of 5, and will fire as soon as 10 people with similar rating have queued. You will have a choice of 3 maps, and then one map is chosen randomly with higher weight being given to more popularly chosen maps. A win in an unranked arena will net you 30s and 1500 rank points, where a loss will award you 15s and 500 rank points. The amount of money you can earn in an unranked arena is capped at 15 gold daily.
Ranked Arena is also a 5v5 match that you can join from the first tab in the PvP interface with the same map selection as an unranked arena. You can only enter a ranked arena as a solo or duo, and these are only accessible when there is a PvP season in progress. You must have a PvP rank of 20 or higher to enter this arena. In addition to the rewards for unranked arena, a ranked arena will also award pips for a ranked arena chest path based on performance: 10 pips for a win, 3 pips for a loss, 1 pip for having a top stat, 2 pips for a close game, 2 bonus pips if you are platinum division, and 4 bonus pips if you are legendary division. A win will also give you some rating, and a loss will take some rating away. There is no cap for gold gained in ranked arena.
Tournaments are 5v5 single elimination brackets that must be queued as a full party for. There are three automated tournaments daily that each have a 22 hour cooldown, to allow for tournaments to fire at all hours of the day throughout the week, but the times they roughly align with are SEA primetime, EU primetime, and NA primetime. Participating in a tournament will award some qualifying points, and winning matches during the tournament will award more. Daily Tournament prizes for placing 1st-8th place range from 1-5 gold and include an equal amount of mystic coins and unidentified dyes.
Every Month, a Monthly tournament will take place. This tournament is also single-elimination and requires a full party of 5 to join, but also requires all 5 party members to have accumulated 100 qualifying points throughout the month. The rewards for this monthly tournament go down to 32nd place, and range from 25-500 gold, 5-100 mystic coins, and exclusive prizes for getting 1st-4th place, including a semblance of your character made into a statue in Heart of the Mists.
Maps and Secondary Objectives:
Forest of Niflhel
Point names: Henge, Keep, Mine
Secondary objectives: Forest Beasts (high priority)
Deyna's take: This is an easy map to learn on, as it has multiple paths to each point and relatively few choke points for a winning team to take advantage of. The secondary objectives are located in the northeast and northwest corners of the map...one close to each color spawn point. These beasts will award the team that deals the last hit on them with 25 bonus points and a +50 all stat buff. This is huge, as stats are normalized and +50 to all stats is noticeable...especially if your team can secure both beasts and double the power of the buff. Be wary, though: as this bonus is rewarded to last hit, always be on the lookout for an enemy thief lurking to steal the kill.
Legacy of the Foefire
Point names: Quarry, Graveyard, Waterfall
Secondary objectives: Lords (medium priority)
Deyna's take: This map is a reproduction of the one from GW1 with the same name, and as such, is extremely popular with older players and comes up a lot because of it. Sticking to a home/mid approach is extremely easy to do here, as there is a ledge by mid point that you can see enemies coming out of their base from and tell immediately if they are taking a path to mid or home point, and the size of the map allows you to be able to cover both points from this single vantage. The Lords on each team are located behind their respective spawns and inside the castle they spawn in, and storming the enemy castle and killing their lord is worth an immediate 150 points for your team. This is, however, a risky move, as you will need to abandon the points to get to the lord, and additionally, you will need to cross in front of your enemy's spawn to get it. Many teams will attempt a desperation win by going for lord at 330-350 points, but really, holding a 2-cap is still the best and surefire way to win. Just keep an eye on your castles backdoor and make sure they dont try to sneak a win in.
Battle of Khylo
Point names: Windmill, Clock Tower, Mansion
Secondary Objectives: Trebuchets (low priority)
Deyna's take: This is a comparatively small map that awards aggression moreso than the other maps, simply because both team spawns are enclosed behind a wall and a choke point that the enemy team can stand on top of and spawn camp. Outside of this, however, there are a lot of different paths and shortcuts (and a mini-jumping puzzle) up to and around the various points, making it easy to evade more stationary characters. Each team is given a trebuchet, located near their spawn, and being hit with a trebuchet shot will knock you back and deal roughly a quarter to half of your health, depending on how tanky you are. Many people, however, will ignore the trebuchet; as it is very hard to hit points consistently with it and those that are decent shots with it can usually do more damage by being on point instead of firing onto it.
Temple of the Silent Storm
Point names: Altar, Gate, Temple
Secondary Objectives: meditations (high priority)
Deyna's take: My favorite map! This map is conducive to both a home/mid and a home/far approach, as the secondary objectives are easier to get to from the side points. There are choke points and vantages going toward all three points but enough space that engaging in the chokes is not necessary if you are behind. There are two meditations, Stillness and Tranquility, that if your team completes a channel on them will give bonuses to your team: Stillness will allow your team to gain double points off of every point you have capped, and Tranquility will immediately flip all three points on the map in your favor, as well as create an ice blast to knock all enemies off of the points. Very, very important to ensure that your team can either secure the meditations or minimize the damage they do, but also important to not over commit to the meditations, as placing someone to guard and harass the meditations to allow the rest of their team to cap points can be detrimental if allowed to go on long enough.
Raid of the Capricorn
Point names: Bazaar, Archway, Docks
Secondary Objectives: Bell (medium priority)
Deyna's take: Another easy, wide-open map that is great for learning PvP, as there are very few set paths to anywhere and lots of room to move around. The bell, which is located opposite the mid point, is another point that will spawn occasionally and reward the team that caps it with a handful of bonus points: 25 for the first time, 50 for the second time, 75 for the third time, and 100 for the fourth time. This is tracked separately per team, so if red team caps the bell twice, a third time will net them 75 points, but if blue team hasnt captured yet and caps it instead of red, they will earn 25 points. Always make sure that you are keeping an eye on the bell, but the three main points are better for more consistent points early: just dont let the enemy team hit a massive bonus by getting multiple bells in a row.
Skyhammer
Point names: A, B, C
Secondary Objectives: Skyhammer (high priority)
Deyna's take: Anet got really lazy with point names on this map, but make up for it with an excellent map design: all three of the points have a plethora of ledges and vantages to make holding a point more difficult, but the double-edged sword is that on many of these ledges you are fully exposed from all sides to all manner of surprise attacks. An open maze separates the three points, and in the middle of the map, a portal will occasionally open up to a floating platform with another point to control the Skyhammer: if your team can cap the Skyhammer, then it will fire on all three points twice, stunning all enemies on it, dealing 50% damage, and immediately decapping the point if its an enemy point. Be careful on the skyhammer, though: it is very possible to be knocked off the side of the platform and fall to your death. Probably the most difficult map to play, but also one of the more fun ones to play on.
Eternal Coliseum
Point names: Lion, Field, Dragon
Secondary Objectives: Artifacts (low priority), Crowd rally (medium priority)
Deyna's take: This is a HUGE map that makes holding side points extremely difficult, which means that winning a fight at mid is absolutely paramount. Two artifacts will spawn at the north and south of the map: a sword and a shield. The sword will give the person that takes it increased damage, and will auto-stomp enemies in the vicinity of the buff holder. The shield will give the person that takes it increased life and toughness, and will auto-res once if they are downed. After a 6x killstreak, you will gain the ability to rally the crowd, which gives +50 stats to your entire team for one minute. Between the difficulty to rotate in this map and the crowd rally for killstreaks, this is hands down the hardest map to make a comeback from if you fall behind. Win the initial fight and pay attention to your backcaps.
Spirit Watch
Point names: Bear, Raven, Wolf
Secondary Objectives: Orb (medium priority)
Deyna's take: This map is not currently selectable in tournaments or ranked play, so I dont see it very much. One of the biggest dangers in this map is actually the spawn point: the spawn points for both teams are so close to each other that, if one team so desires, they can jump directly on the other team as soon as the match starts. This allows for an aggressive strategy at the start, and especially if you have a highly mobile character to take a back exit from spawn, an excellent distraction while they go around capping and decapping the three main points. The spirit Orb spawns in the middle of the map near the spawn points for the team, and channeling the spirit orb will replace your weapon and utility skills with orb skills, similar to picking up a bundle. It will also slow you down and remove all move speed buffs. Taking the Orb to a point you control will earn your team 50 points, and taking it to a neutral or enemy point will earn your team 30 points and, if its an enemy point, decap the point. This is a map where aggression is rewarded, but not nearly to the extent that Khylo does.
That's it for my PvP guide! If theres any questions about how to PvP, or you are looking for more in-depth information (such as specs or map strategy), let me know, either here on the forums or in game (Ubernoob.2947)! Thanks for reading, and hope to see you in the Heart of the Mists soon!
-
 4
4
-
 1
1
-


Remnants of Hope: Rules and Regulations
in Apply to Remnants of Hope
Posted
/sign